A service is something that can be booked into the booking calendar. e.g. a 1 hour driving lesson.
There are numerous configuration options available when setting up a service. These include where the service is provided, post-booking buffers, pricing, allocating and restricting which locations this service can be booked in, what staff are allocated, and many more. You can also specify optional add-on products on a service, that are presented to a client prior to completing their booking, a great way to upsell some of your other offerings.
It’s important to note that prices for varying durations can be set up on single service. e.g. 1 hour $60, 1.5 hour $90, 2 hour $120, there is no need to define separate services for each duration. This is covered in more detail in the Setting up a service section.

Service vs Product/Package
If you’d like to bundle a set of services into a package to offer the client (e.g. a pack of 10 driving lessons), please refer to the Creating a prepaid voucher or package article. In our system, these are created as a Product/Package, rather than a service. Once a client purchases the package, the prepaid vouchers within it will be used as payment when a client books that service in the calendar.
This article outlines how to create a service and setting up the most important tabs first. Other tabs that allow you to configure the services more will be covered in subsequent sections, including how to create a service group if desired.
Once services are created, following these same steps allow you to manage and update them.
Setting up a service - short overview videos
These short videos cover how to quickly setup the different service types, including setting a price for various durations and allocating staff.
Setting up an Onsite service
Setting up a Mobile service
Setting up a Fixed Address service
Setting up a service - Service tab
This section will outline the settings that are available on the Service tab. If you’ve purchased a template you may have some existing services that you can update. Simply go through these next steps to ensure it’s set up to meet your business needs. Ensure that you complete the Pricing tab and Staff tab at a minimum to allow the service to be bookable which are covered after this section.
Steps
Click the Add New Service link. The following fields appear (image may not be complete as extra features are only available once a service is saved), and a table with descriptions is provided below the image.
Note: When you’re first creating a service the Pricing and Staff allocation information may appear in this same tab initially too.
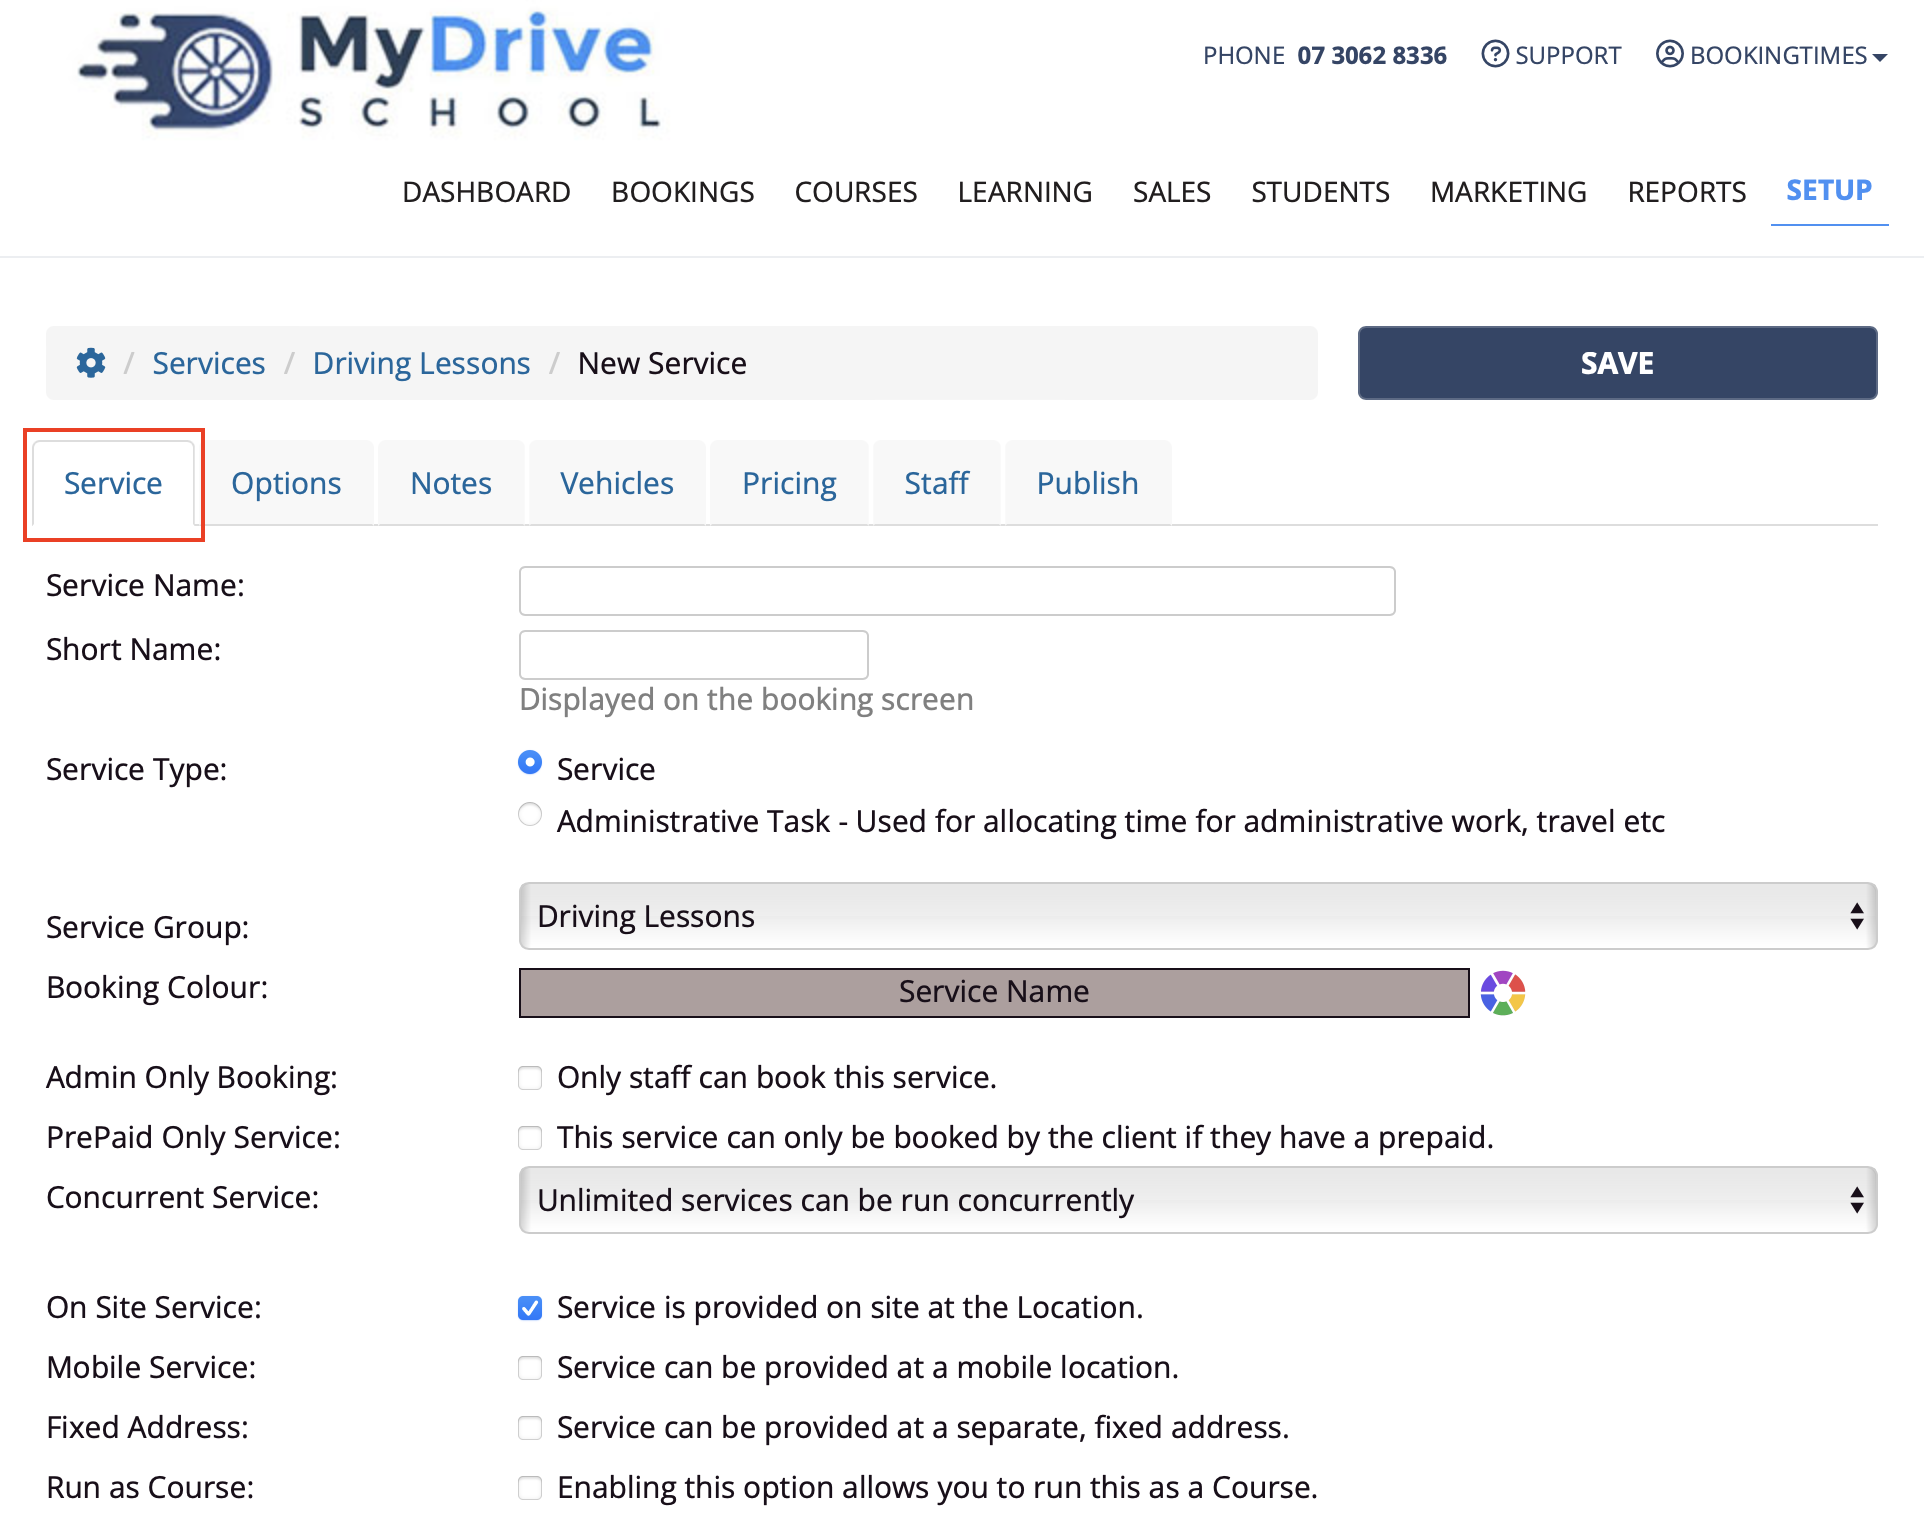
Field definitions:
Field name | Description |
|---|---|
Service Name | the name of your service |
Short Name | if your Service Name is very long you can add a Short Name so it can display fully on the booking screen |
Service Type | if it's an admin task, the service won't be visible on the public booking screen |
Service Group | if it doesn't exist please follow these steps to create a service group |
Booking Color | colour-code your services so it's easier to recognise them when you look at your schedule |
Admin Only Booking | only staff members can book it and the public cannot see it on the bookings screen |
PrePaid Only Service | can only be booked by the client if they have a prepaid voucher for this service |
Concurrent Service | if this service can be run concurrently with other services. e.g. 2 people book and pay and have the service provided to them at the same time. Most businesses will not have this enabled. |
On Site Service | (e.g. a massage) your service is offered from the main business location |
Mobile Service | (e.g. a driving lesson) your service is offered mobile and requests client upon booking for a pick up and (optionally) a drop off address. (Note: drop off address set up via Business Detail > Locations) |
Fixed Address | (e.g. First Aid centre) your service is offered from a separate fixed address in an Address text area field that appears below it when you select this option |
Run as Course | is this service is a course or standard service. To see more about configuring a course, read this guide: Setting up courses |
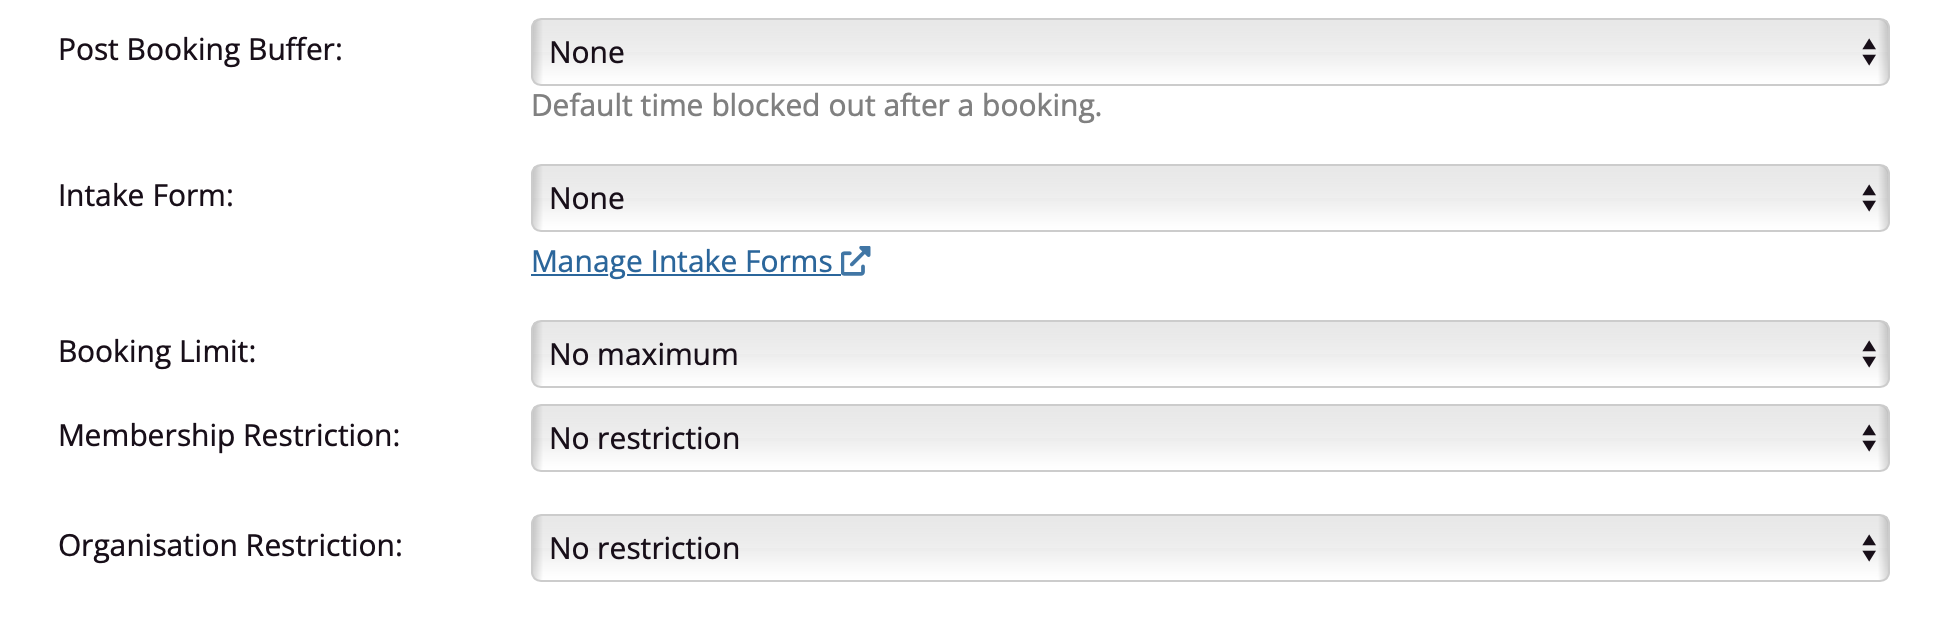
Post Booking Buffer | the amount of time you would like blocked-out on the calendar after the service is booked. This will allow you time to prepare for your next client, or drive to your next service. This buffer can be overridden for each staff member, see the Adjust post booking per staff member article |
Intake Form | if you'd like the client to provide any extra information prior to the service they can do this on an intake form. See the Creating an intake form article for more information (Note: this is only available on the Nail and Scale plan) |
Booking Limit | impose a booking limit per client for this service (Note: this is only available on the Nail and Scale plan) |
Membership Restriction | if you'd like to only allow clients within a particular membership group to book this service. Please see the relevant section in the Creating membership groups article for more details. |
Organisation Restriction | allows the option to only allow Organisation Administrators to book, or not to book, this service |
Addon Product Option | allows you to optionally display any add-on products prior to the client completing their booking for this service. |
Addon Product | if the option above is selected, select which add-on products you’d like to appear. |
Service - Pricing tab
Under the Pricing tab is where service pricing is set up for each location, and for each service type you’ve selected (mobile/onsite/fixed) as you may want to have different prices for these.
Prices for varying durations can be set up on single service. e.g. 1 hour $60, 1.5 hour $90, 2 hour $120, there is no need to define separate services for each duration. These durations will then be automatically displayed for the client when booking (if that duration + any post booking buffer that you’ve defined) fits into the calendar slot that they're trying to book into. For example:

Ensure that you complete this Pricing tab and Staff tab at a minimum to allow the service to be bookable which are covered after this section. If this Pricing tab isn’t set up, no staff can be allocated in the Staff tab.
Steps
Click on the Pricing tab
Enter optional pricing details:
Select Credit Card Surcharge
Upfront Deposit (this will be added to their client balance)
Enter the price for each duration that you wish to offer. Separate rows will appear if you have multiple locations defined, and if the service is offered across mobile/onsite/fixed:
The location that you want this service offered in. e.g. Townsville and Victoria are 2 separate locations in example below.
The service type (i.e. depending on if you selected mobile/onsite/fixed in the Service tab earlier). e.g. rows appear for Onsite and Mobile in example below.
Click Save

Updating the service pricing across your website pages
This will update the pricing displayed when booking in a service. You may need to add or change the pricing displayed on your website pages if they have not been automatically linked up using @Price placeholders such as on the homepage or on the published service pages. See Using pricing shortcodes/placeholders,
Please see the following article for full details: How to make a price change
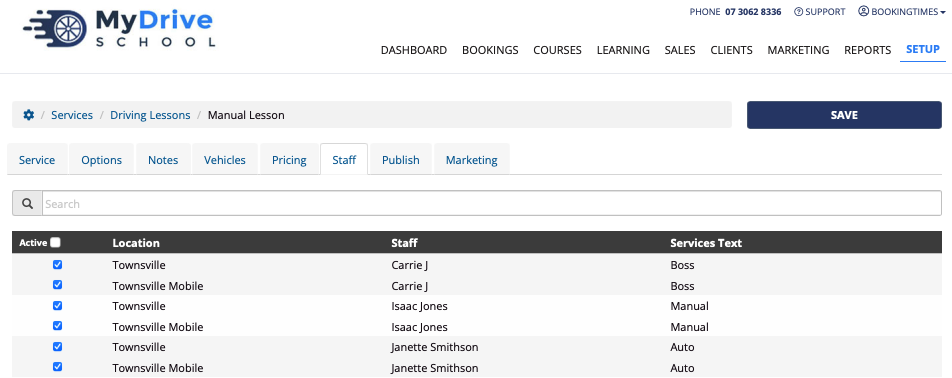
Service - Staff tab
Under the Staff tab is where you define what staff will offer the service, in which location (and the service type: mobile/onsite/fixed). Ensure that the Pricing tab is set up, otherwise no staff can be allocated in this Staff tab and the service will NOT be bookable.
Steps
Click on the Staff tab
Check the staff members in which location (and service type) that will offer the service. If no staff members appear, ensure the Pricing tab has been set up.
Click Save
Adding and editing staff members
To learn more how to create or edit staff members, check our Creating a staff member article.
Service - Publish tab (optional)
Under the Publish tab, you can optionally publish information that appears publicly on your website to outline your service. You can decide if you would like to dedicate a whole page on your website to this service, just have a published page for a service group that covers a few of your services, or no published pages at all.
Steps
Click on the Publish tab
Check Publish on Website
Enter the page content, such as text and images in the text editor
For more advanced editing using the diagonal red arrow icon, please see the Adding a new section and subsequent sections within the How to edit your website using the website editor article.
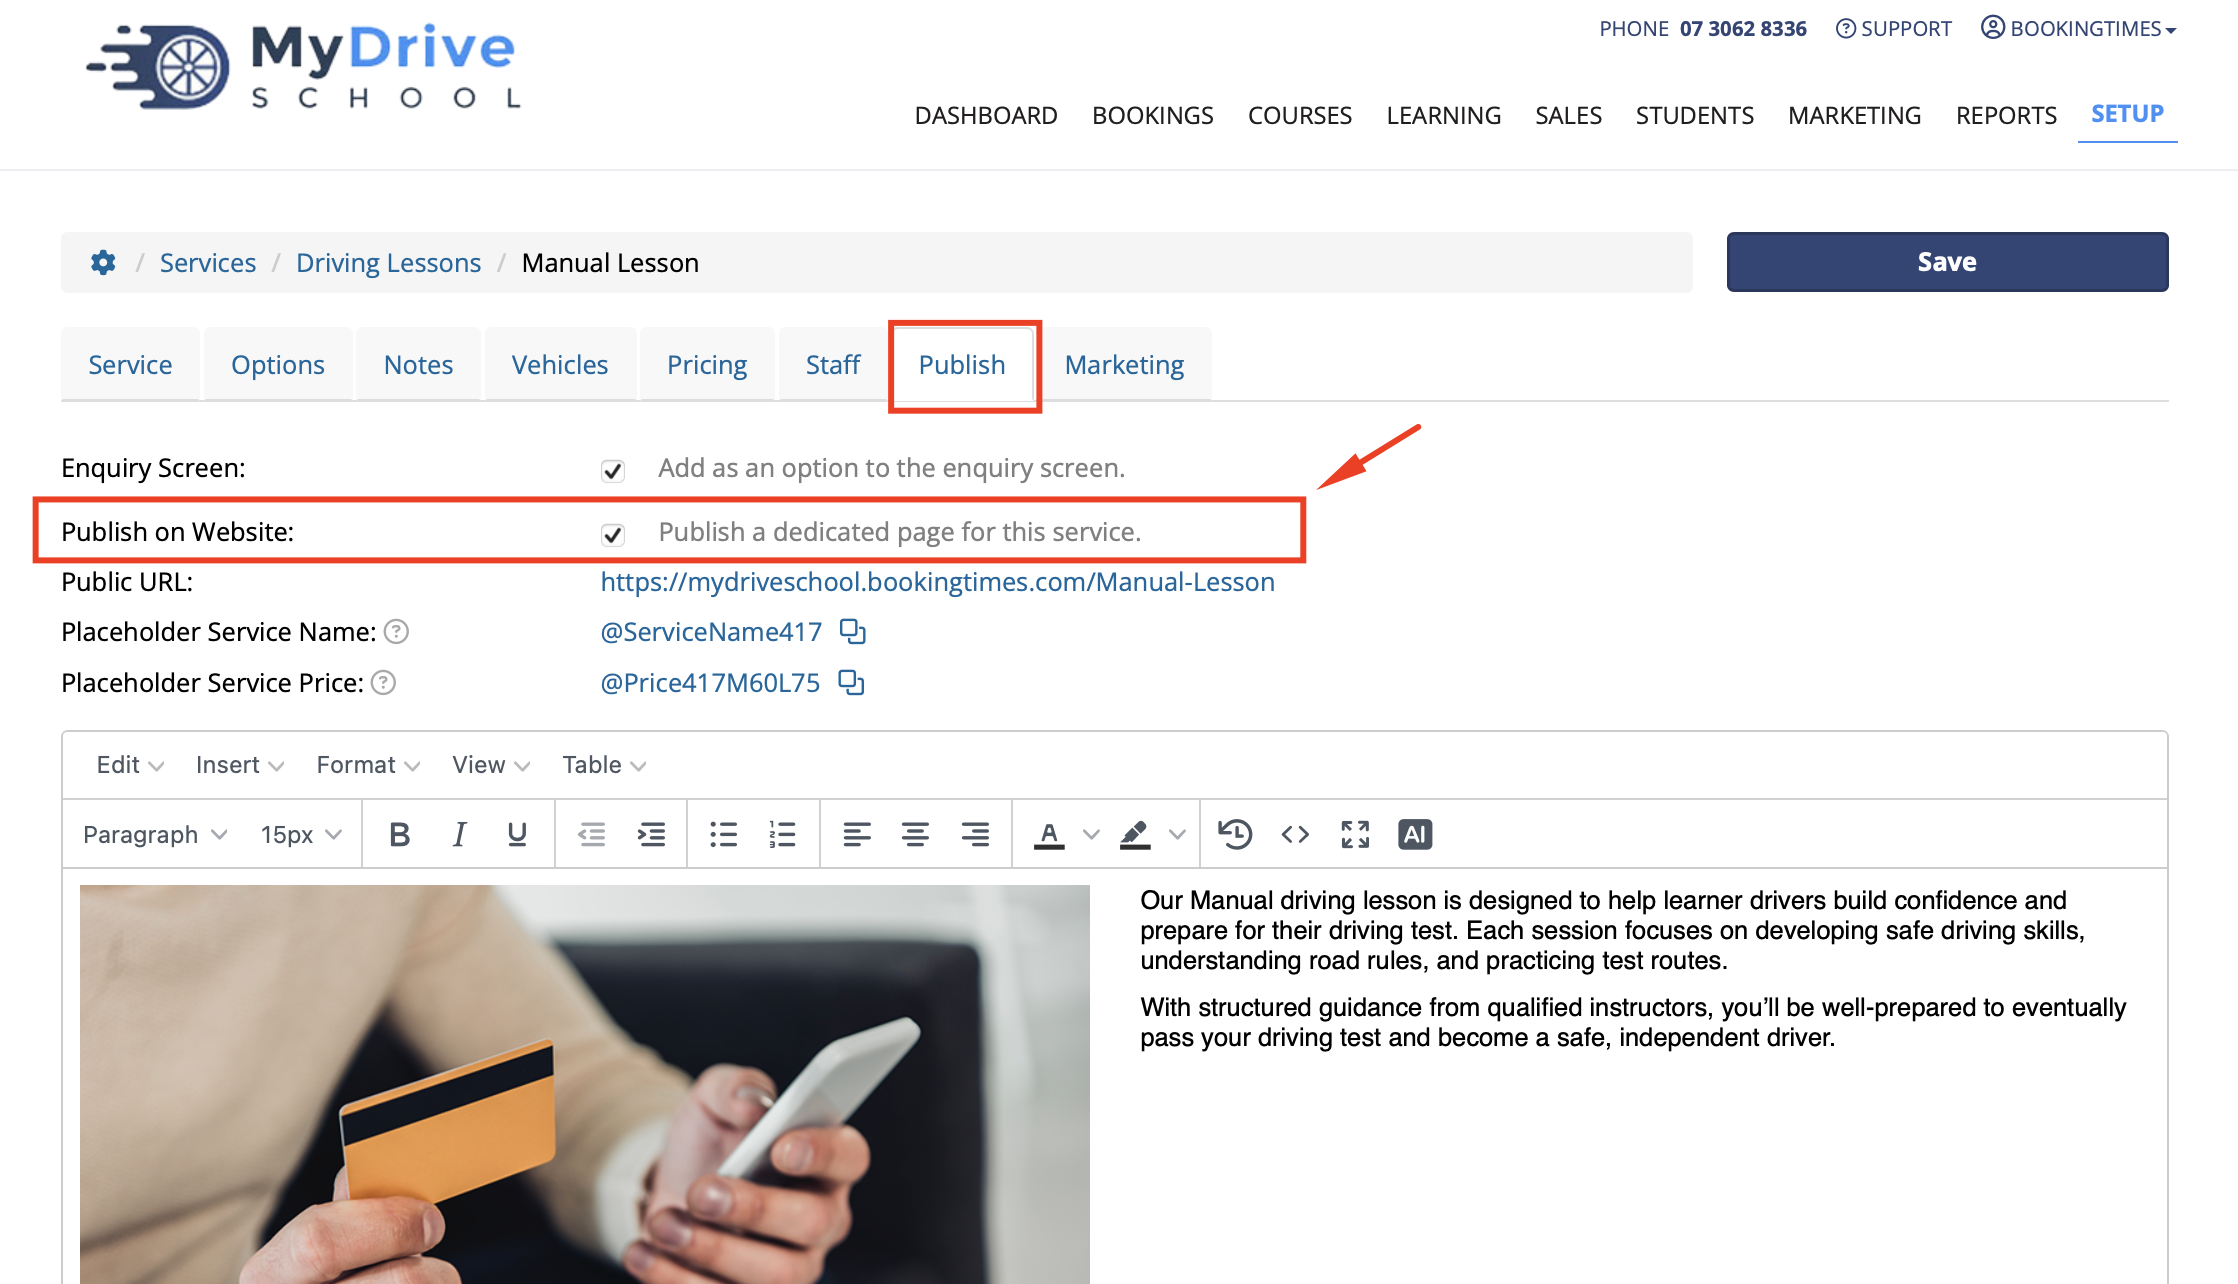
Click Save
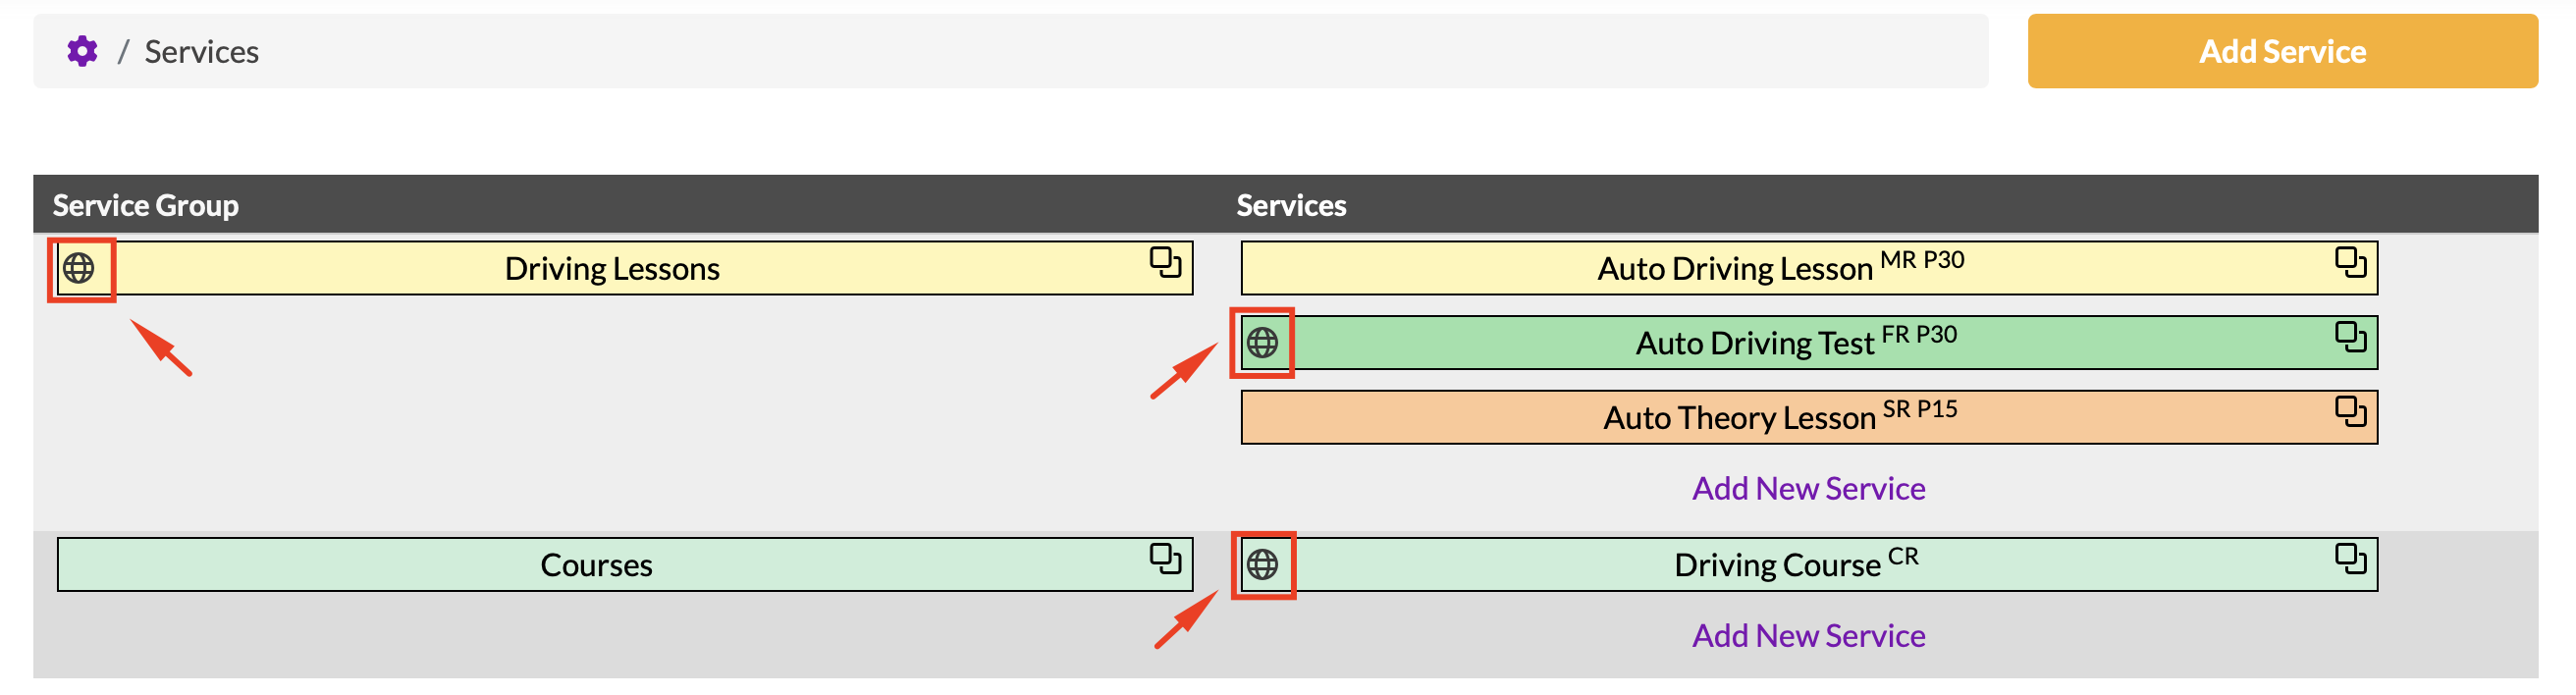
You can quickly see all the services (and service groups) which are currently published on your website as they will have little globe icons to the left of them on the Services summary page which can be accessed via Setup > Services.
Display service menu on website
For your service pages to show up you will need to make sure your Services menu link is turned on. See Editing the menu for instructions
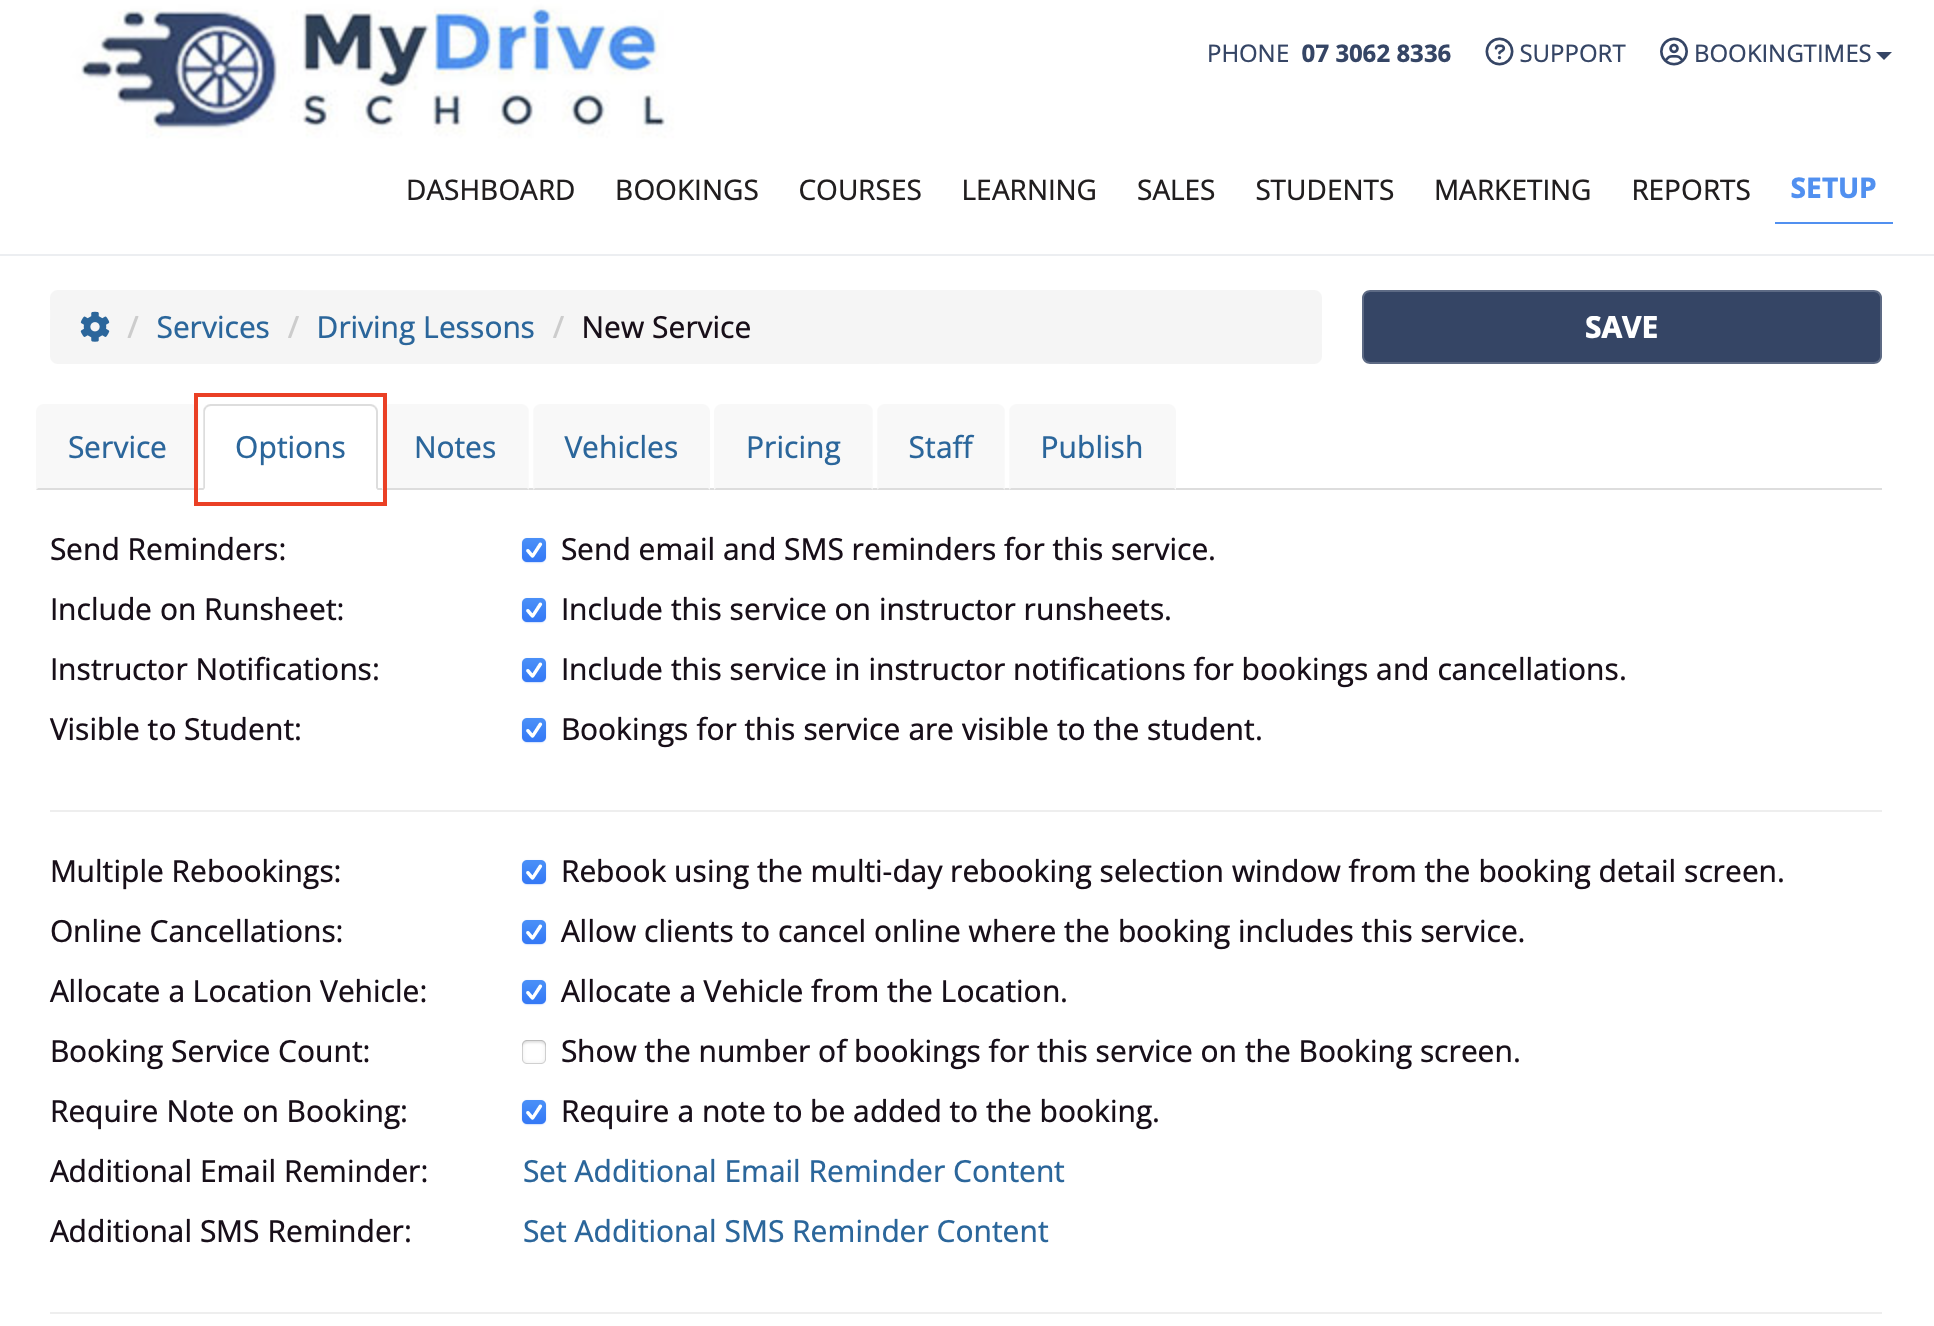
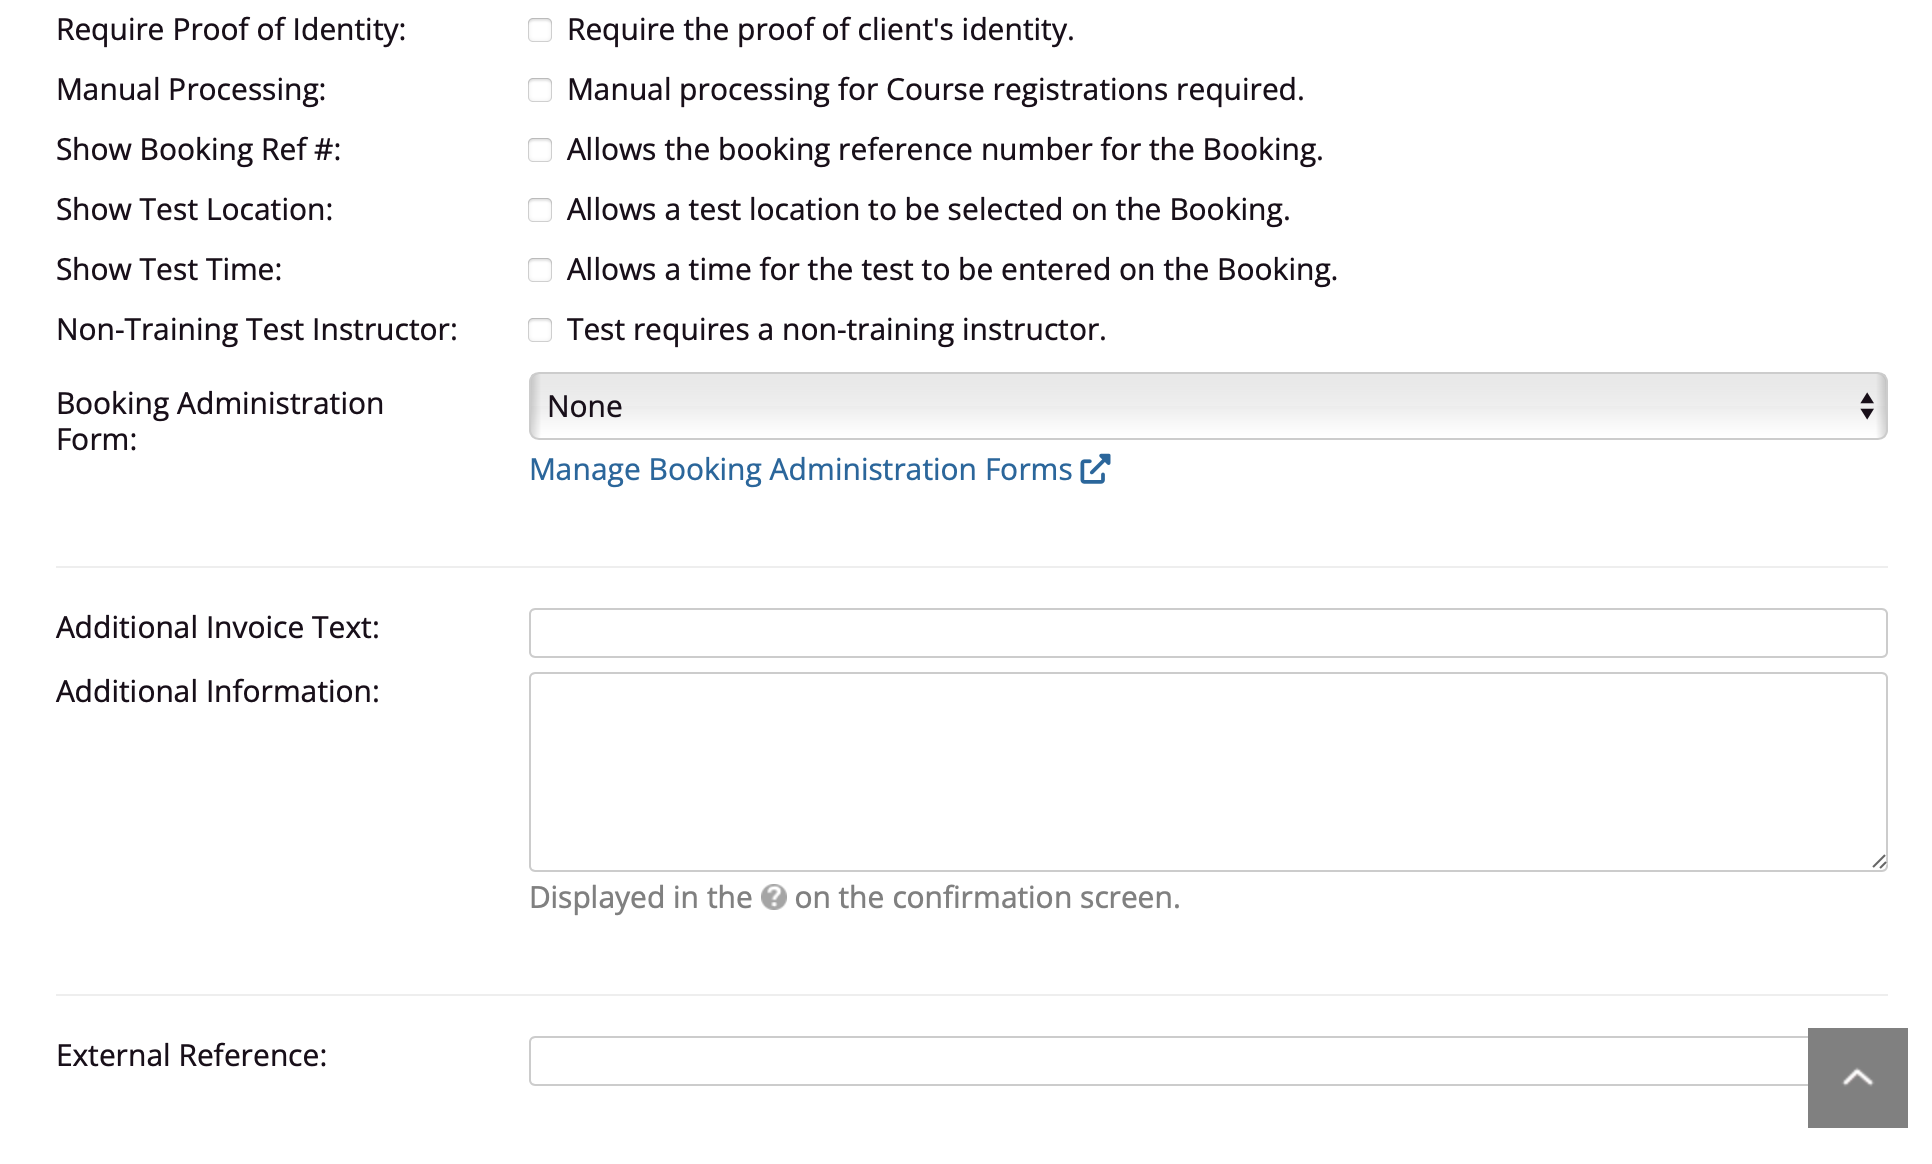
Service - Options tab
Under the Options tab, you can further configure the service to your needs. Some of the options include:
Setting up reminders and notifications
Booking and cancellation options
Enabling AVETMISS reporting if you’re an RTO
Commission management for instructors
Test details: show Pass/Fail, certificates, add Booking Reference Number, add Test Location/Time, enable Non-training Staff for the test
Adding any additional information for your service. e.g. the client must provide own manual transmission car for the lesson

Show Pass/Fail option and link to newsletters
If a service has the "Shows a Pass/Fail on the booking" selected, then any clients who book this service and are marked as a "Pass", will be added to a recipient list which can be utilised with the newsletter functionality.
The pass fail option also allows for you to message clients on either outcome (found in the reminders setup). This option is excellent for asking for reviews - even if the service does not technically require "pass or fail"
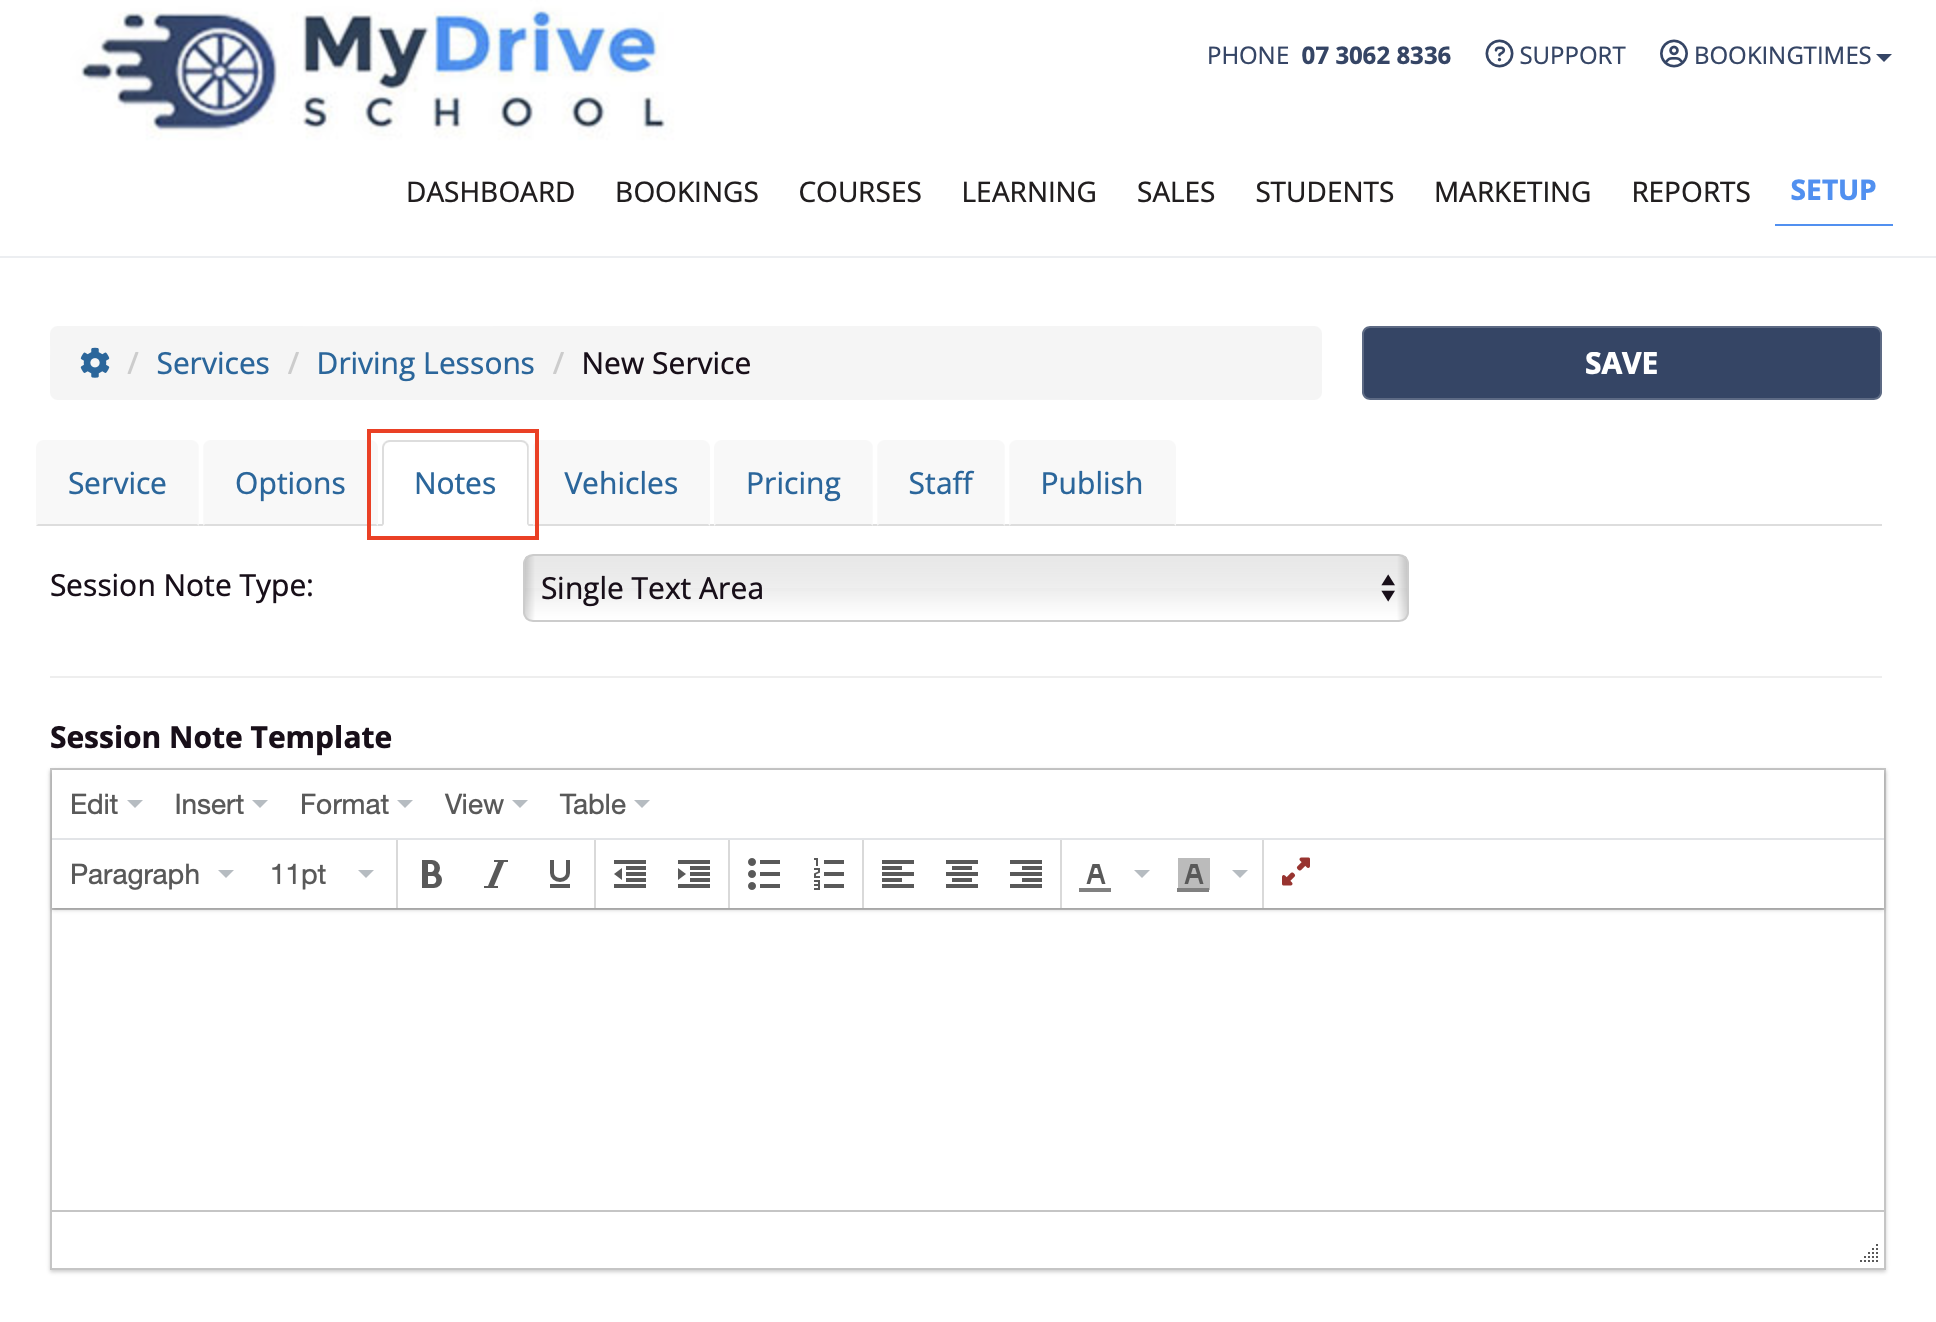
Service - Notes tab
Under the Notes tab, you can configure how to set up notes on a service. Please see the Create booking note templates article for more details.
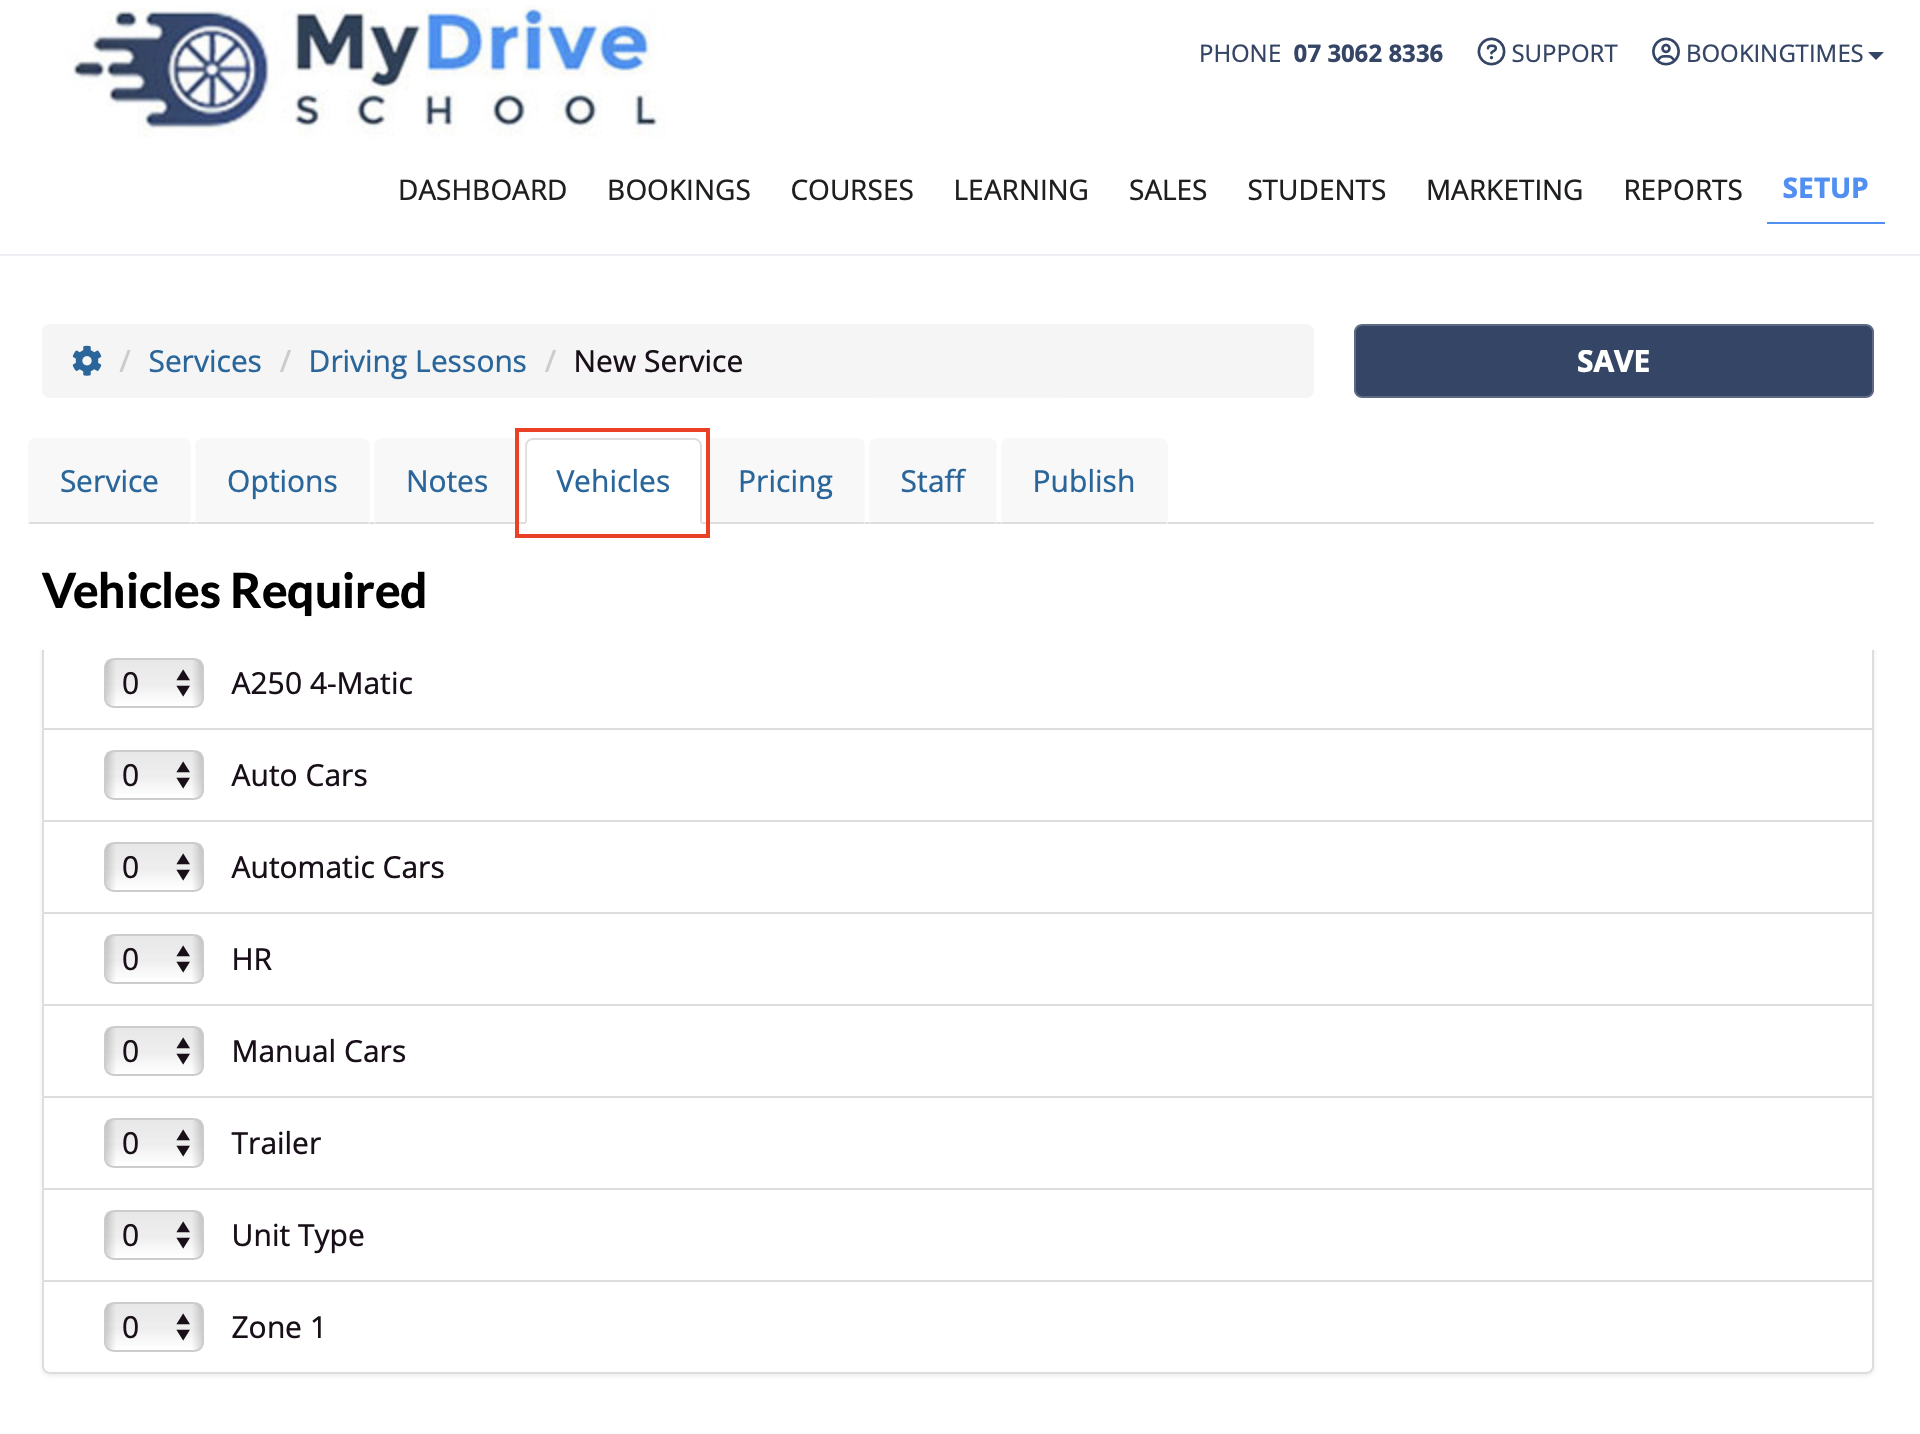
Service - Assets (Vehicles/Equipment tab)
Under the Assets tab (this could also display as Vehicles/Equipment depending what terminology has been set up) you are able to allocate any booking assets that you might have defined on a service. Please see the Booking assets article for details on how to create any service assets and then assign them to a service, noting this requires the Nail and Scale plan.
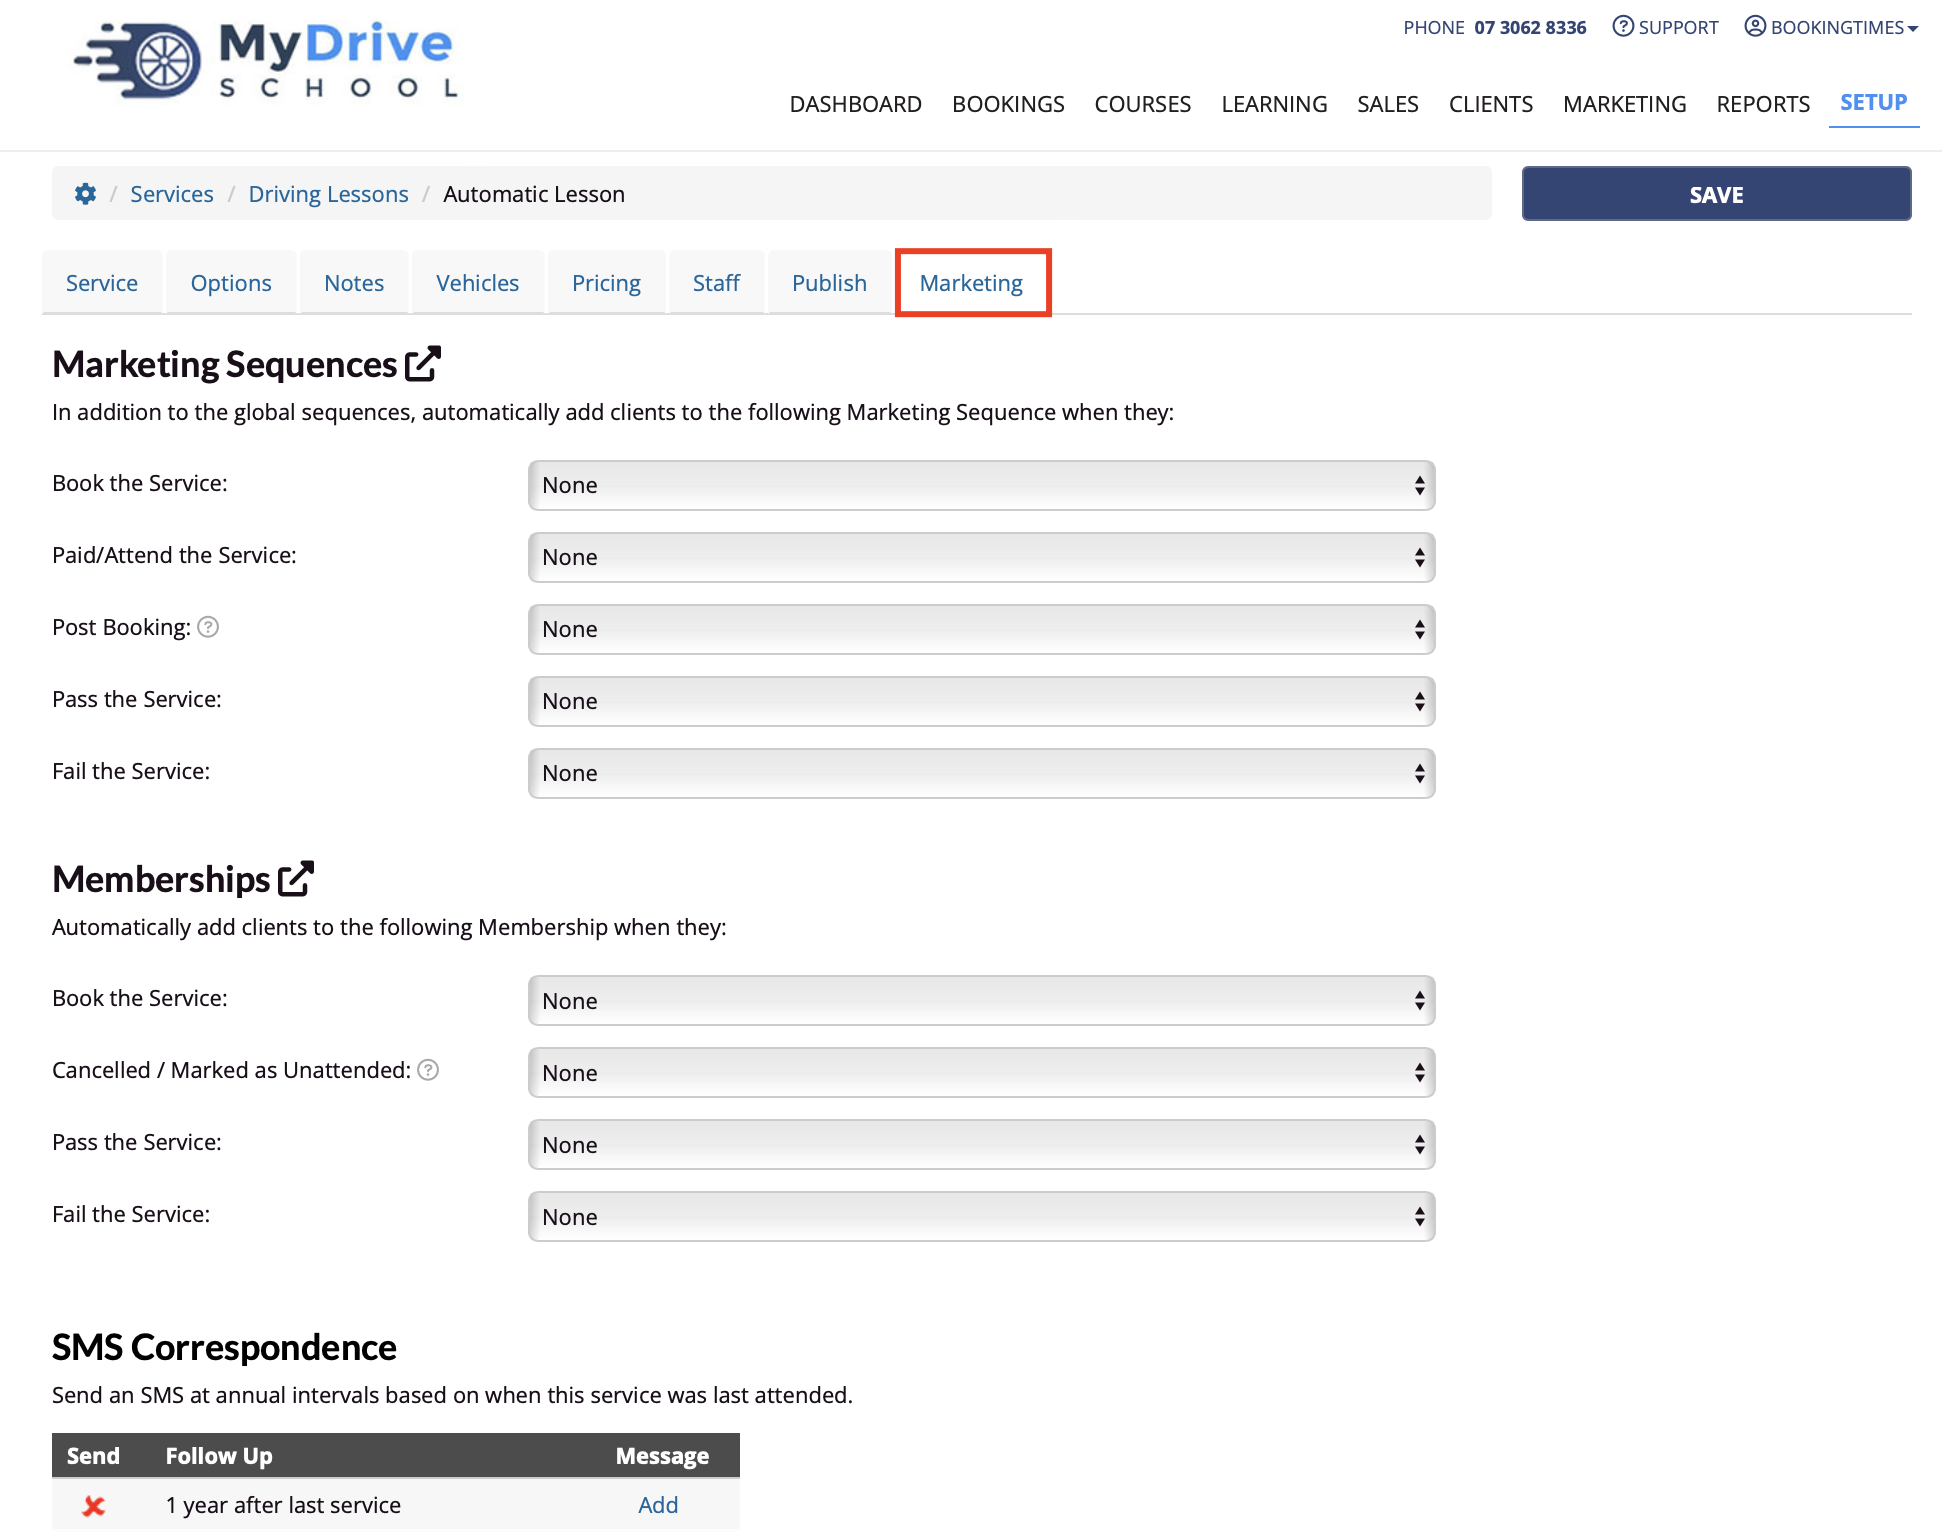
Service - Marketing tab
Under the Marketing tab, marketing sequences and membership groups can also be allocated upon certain triggers for a service (e.g booking, pass/fail). Please see the Marketing sequences, and Creating membership groups articles for more details.
Setting up a service group
Each service can be logically grouped within a Service Group to allow easier navigation for the client when they view information on your Services. It also allows you to publish a page specific to the service group if desired rather than individual published pages for each service.
For example, you might publish a single page for the Driving Test service group which outlines all the information for these types of services in general, rather than create a separate page for the Manual and Automatic test services.
Steps
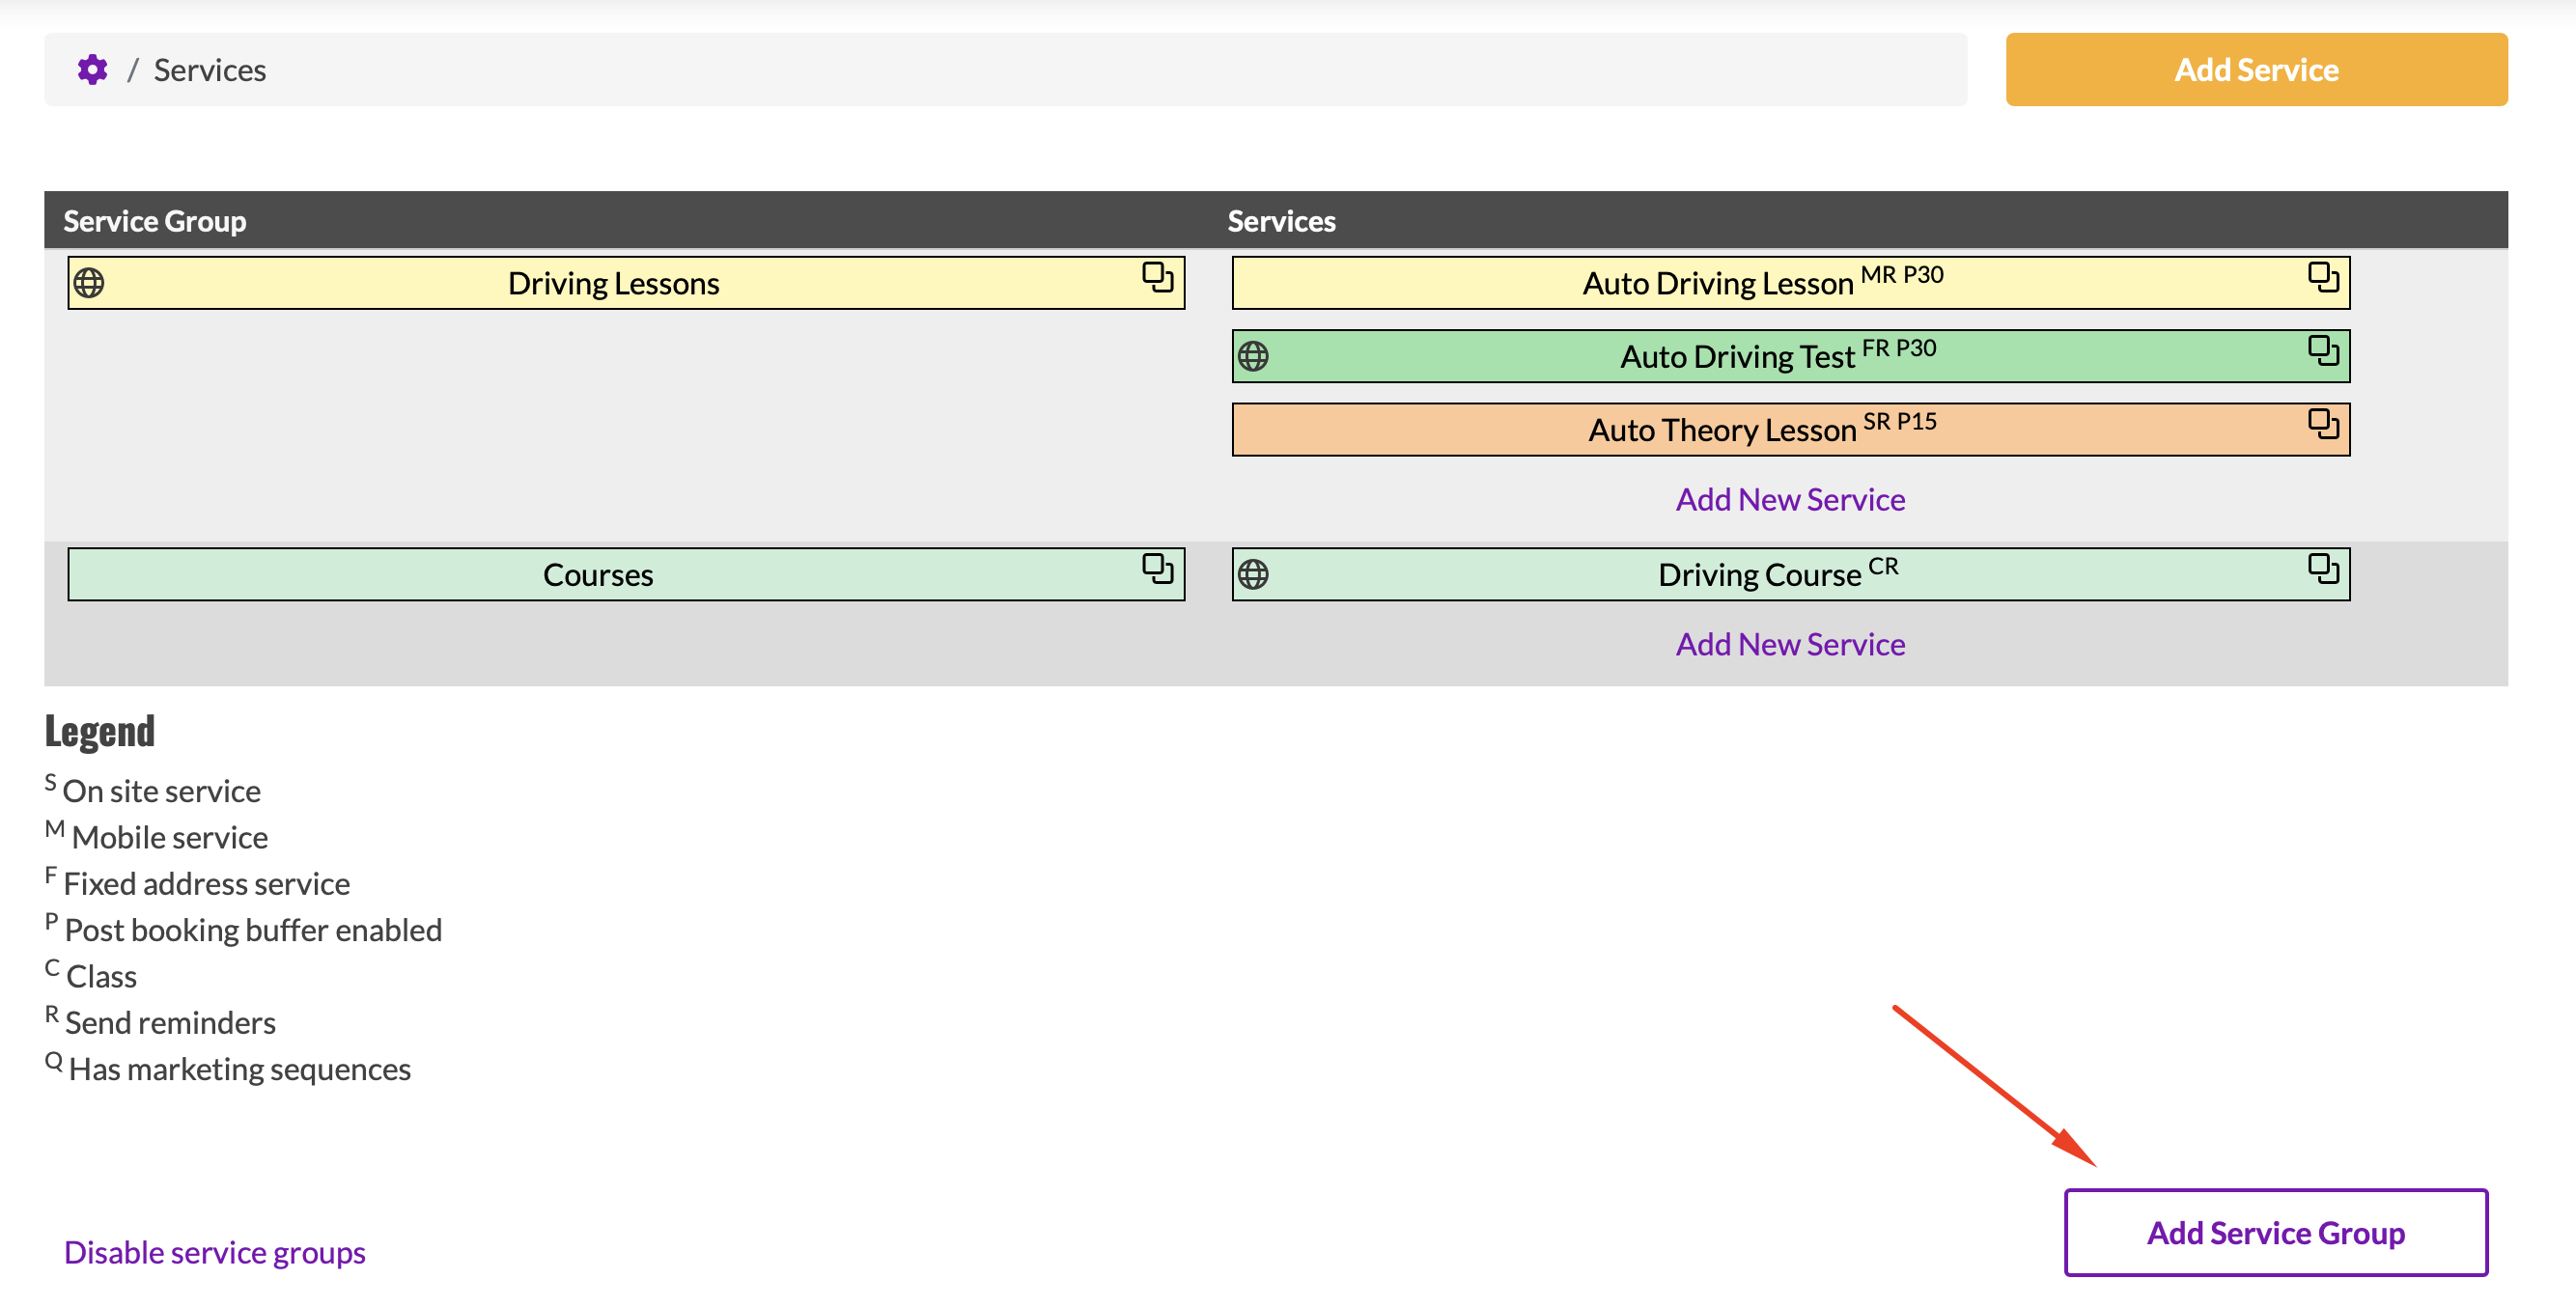
Navigate to Setup > Bookings > Services
Click the Add Service Group button (if you have any exisiting services this appears below them).
Enter the service group details:
Enter a Service Group name
Select a Default Booking Color
Enter a Booking Page Note (optional)
Booking page notes are displayed on the calendar during the service selection. Adding information here provides opportunity to display requirements, instructions, or explanations for your clients.

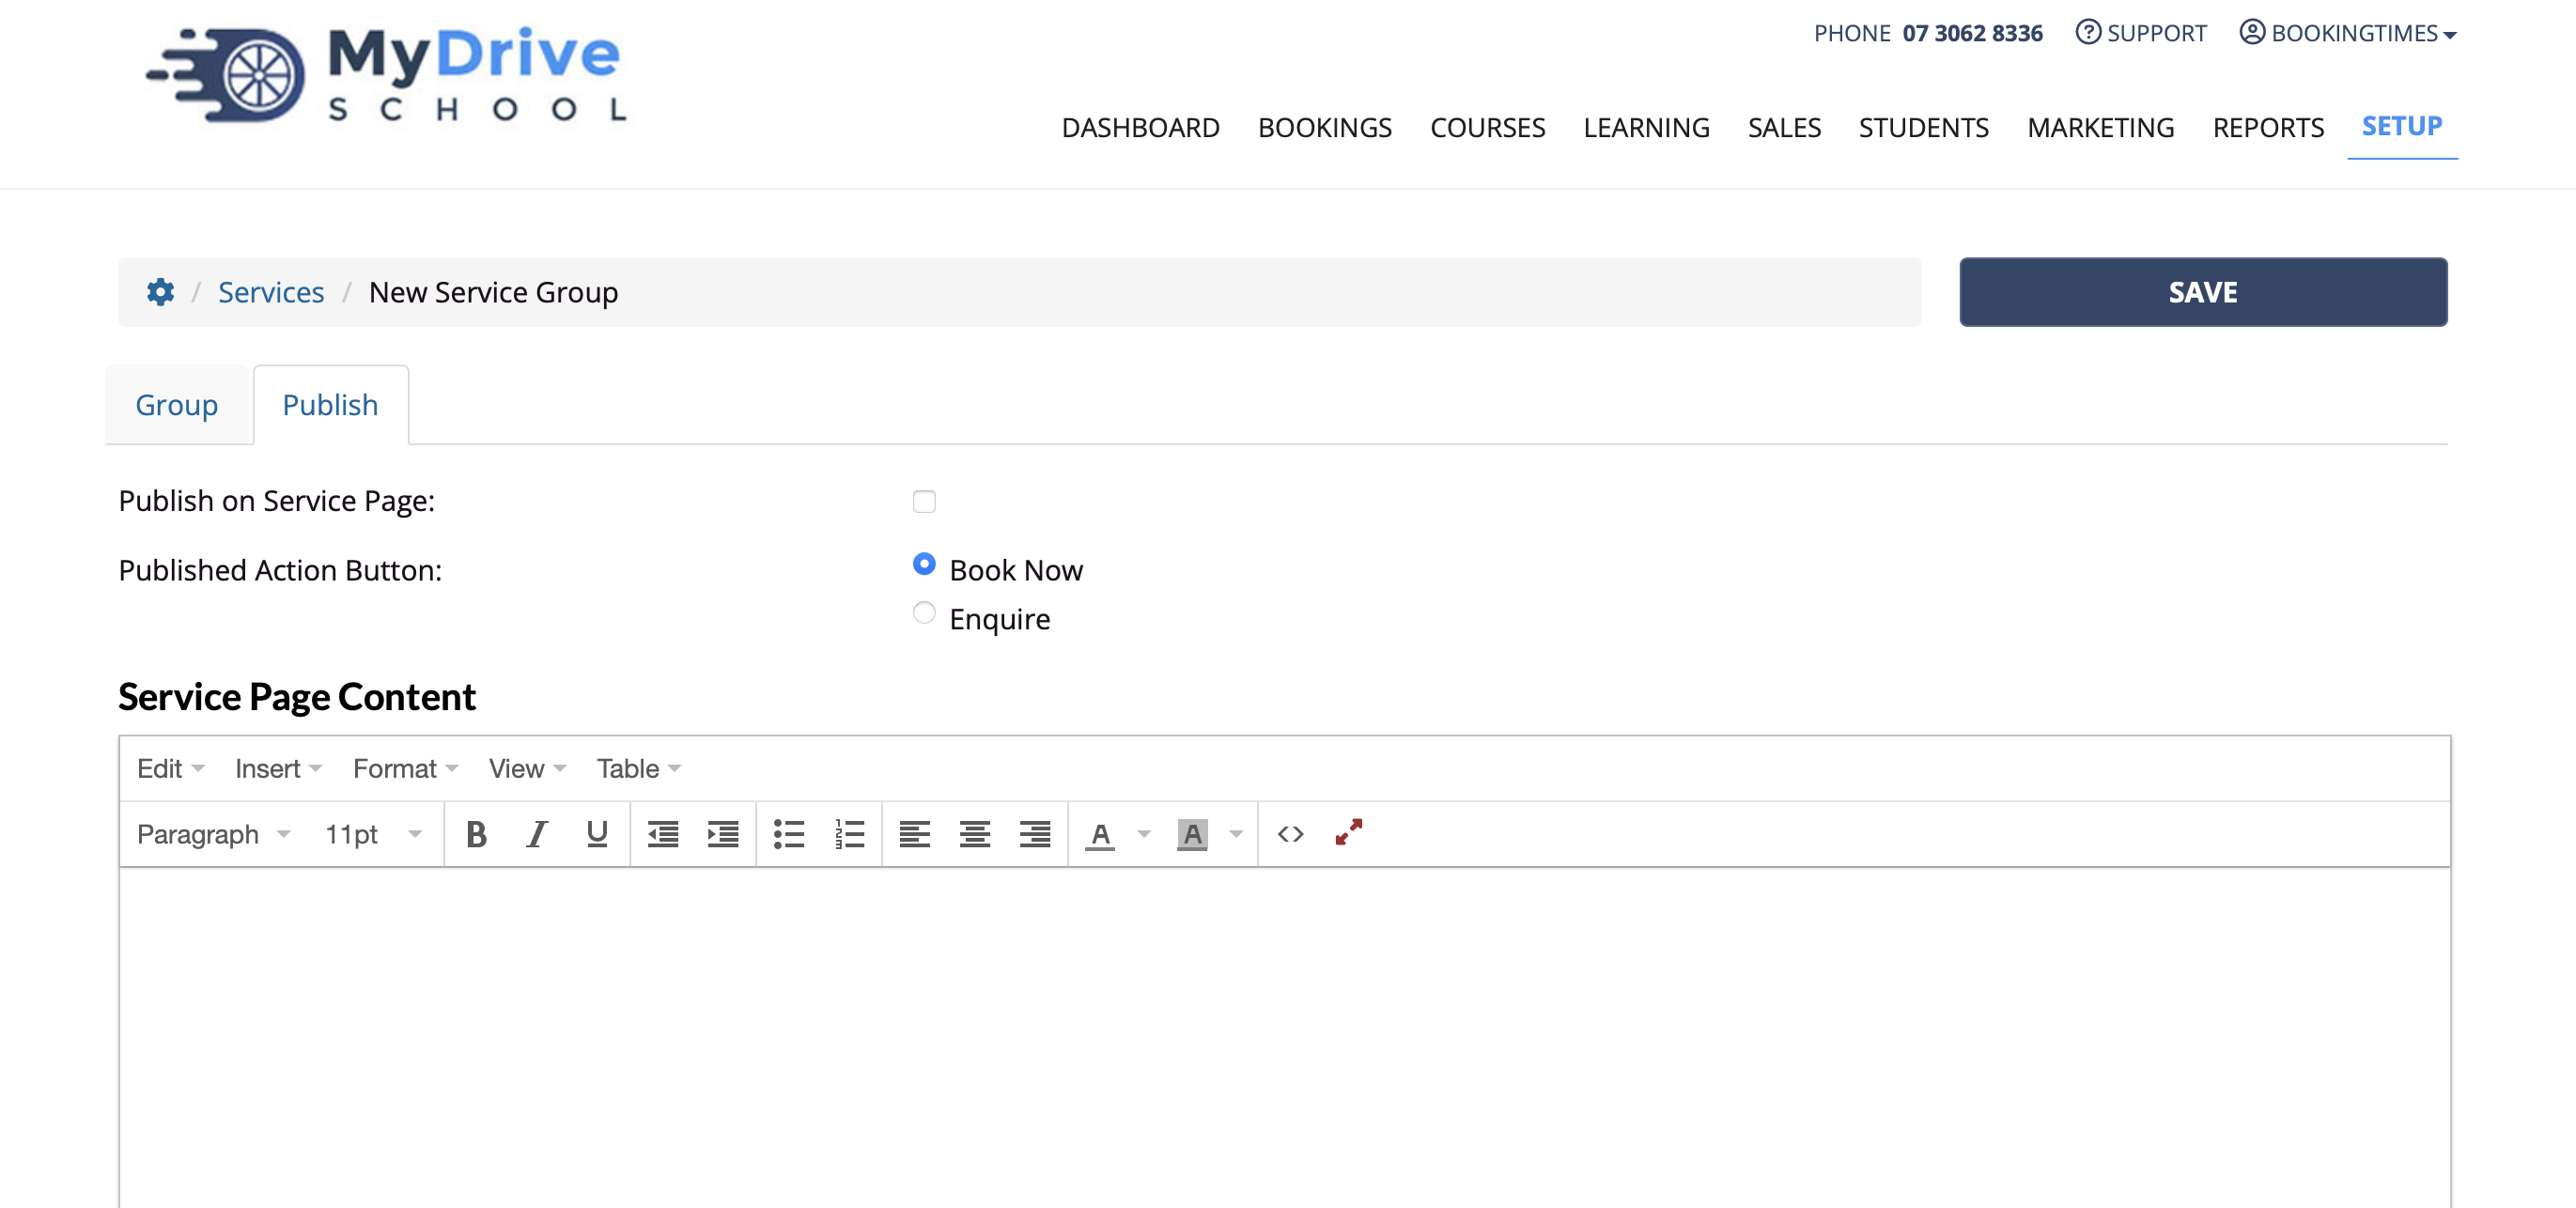
On the Publish tab, you can decide if you optionally want to create a whole page on your website to this service group:
Check the Publish on Service Page
Select the Published Action Button you’d like to appear:
Book Now button takes the client to the booking calendar
Enquire button takes the client to your Contact page
Enter page content, such as text and images in the Service Page Content text editor. See Service - Publish tab section for more details.
Click Save
Remove a service
Please see the Remove a service article for details on how to remove a service.