A service voucher is a prepaid voucher which can be redeemed for one of your existing services or courses. It can also be used to bundle up multiple services into a package - often for the purposes of applying a discount.
They can also be restricted based on location depending on your setup and plan. e.g. if you charge more for a bundle of lessons in a certain location. And they can also be gifted to other clients (depending on if that option is enabled within your system configuration).
Some examples of prepaid voucher and packages are shown below:
Product type (system defined) | Product name |
|---|---|
Prepaid/Voucher - Service Bundle | Prepaid voucher for 1 x 1 hour remedial massage |
Prepaid/Voucher - Service Bundle | Prepaid voucher for 5 x 1 hour auto driving lessons |
Prepaid/Voucher - Service Bundle | Prepaid voucher for 5 × 1 hour auto driving lessons and 1 x defensive driving course |
Please watch this video to give you an overview of how to create a prepaid voucher/package, with detailed instructions following in the subsequent sections. Please ensure your product has an associated image set if you want this to be publicly available as this video used existing products as outlined in Publish your product.
Creating a prepaid voucher or package
These steps will outline how to create a prepaid voucher or package. After this is done, you will then need to Publish your product if you want it to be available to be purchased online via your online store/packages area.
Steps
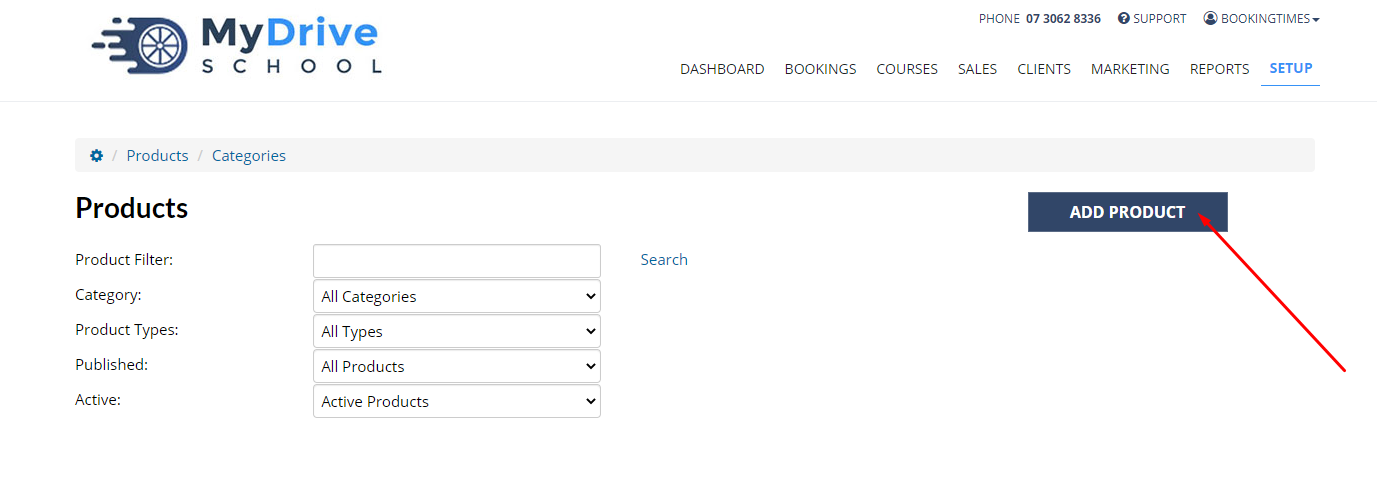
Navigate to Setup > Shopping > Products & Packages
Click Add Product
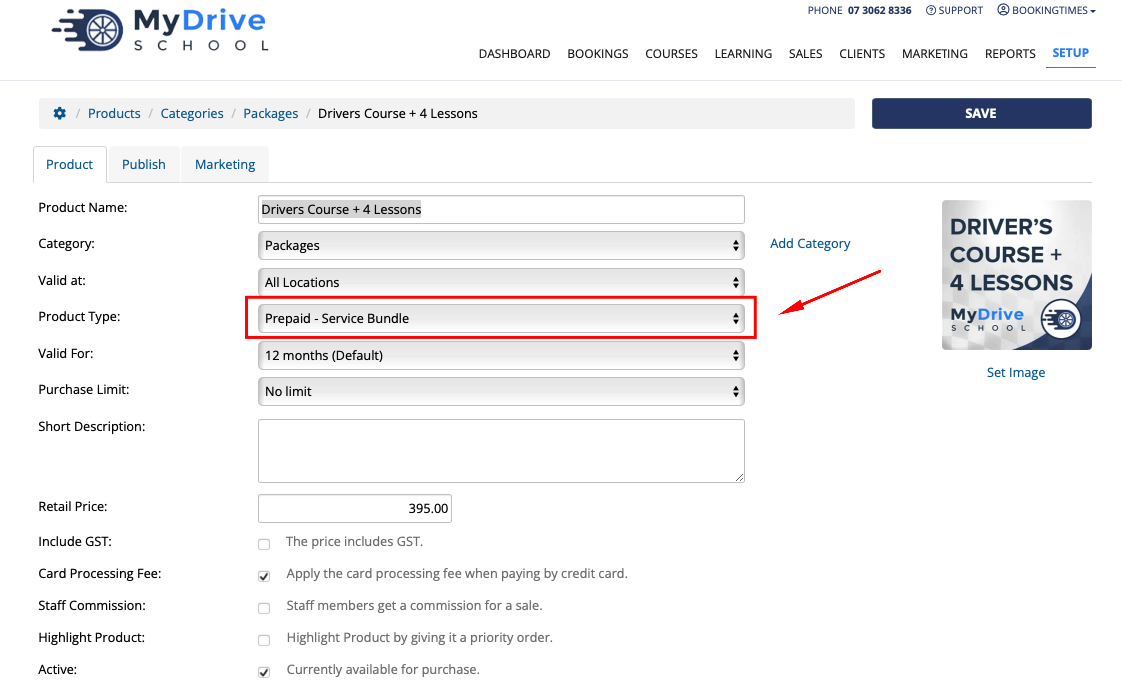
Enter the Product Name
Enter the product Category
See Creating product categories for more information on adding product categories
Set Product Type to Prepaid/Voucher - Service Bundle
Enter remaining product details, including Retail Price
See Prepaid voucher expiry date for more information regarding expiry dates
Select Active if you’d like this product to be available for purchase (please note you will need to Publish your product if you want it to be available to the public, otherwise only system admins will have access).
Scroll down to Bundled Services and select the quantity and which service and duration this prepaid voucher is for:
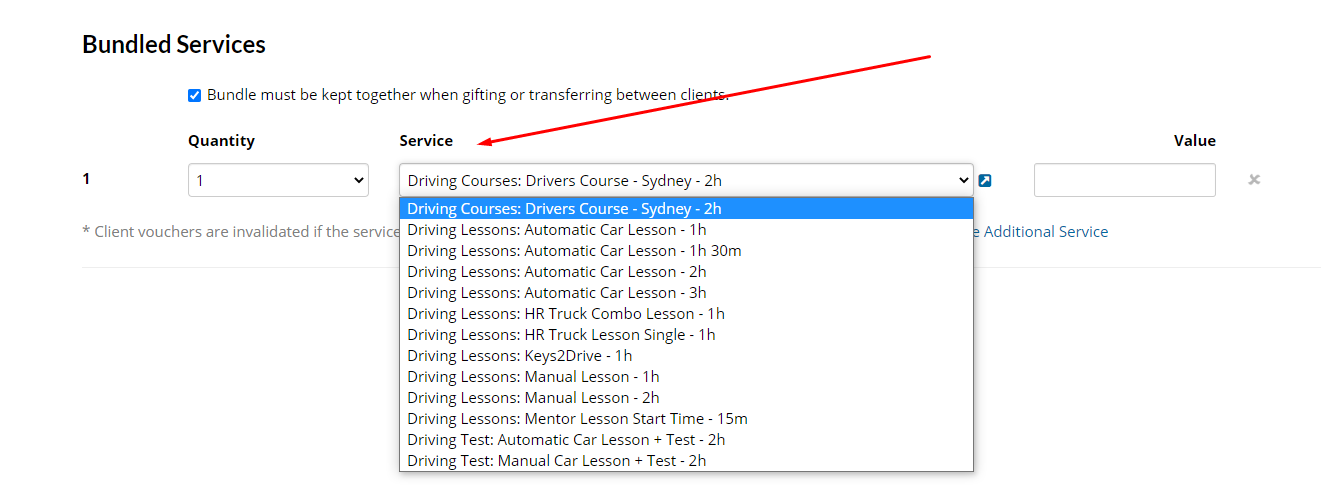
Enter the Individual Value of the service when using the voucher.
Always ensure your individual service values add up to the retail price of your voucher, please see the section regarding individual service values in building packages section in this article.
Click Include Additional Service link if you'd like to include more than one service type in your package or voucher and repeat the previous 2 steps. Again ensuring all the itemised services add up to the retail price of your package.

Click Save
Now you will then need to Publish your product if you want it to be available to be purchased online via your online store/packages area (otherwise only system admins will have access).
Please see the Viewing and redeeming prepaid vouchers article for information on how to view and redeem these prepaid vouchers.
Publishing a prepaid voucher or package
If you want it to be available to be purchased online via your online store/packages area, you will then need to Publish your product.
Restricting a prepaid voucher or package based on location
This feature is available on these plans (view pricing)
A prepaid voucher or package can also be filtered based on a client's location. This means when the client selects their suburb, they will only see prepaid vouchers and packages that are valid for that location.
Please refer to the Filtering your products page by location article for more details.
Steps
Navigate to Setup > Shopping > Products & Packages
Select the relevant product. You may wish to name it with the location name included to distinguish it from the other same packages valid for other locations.
Select Valid at to the location you wish it to be valid for
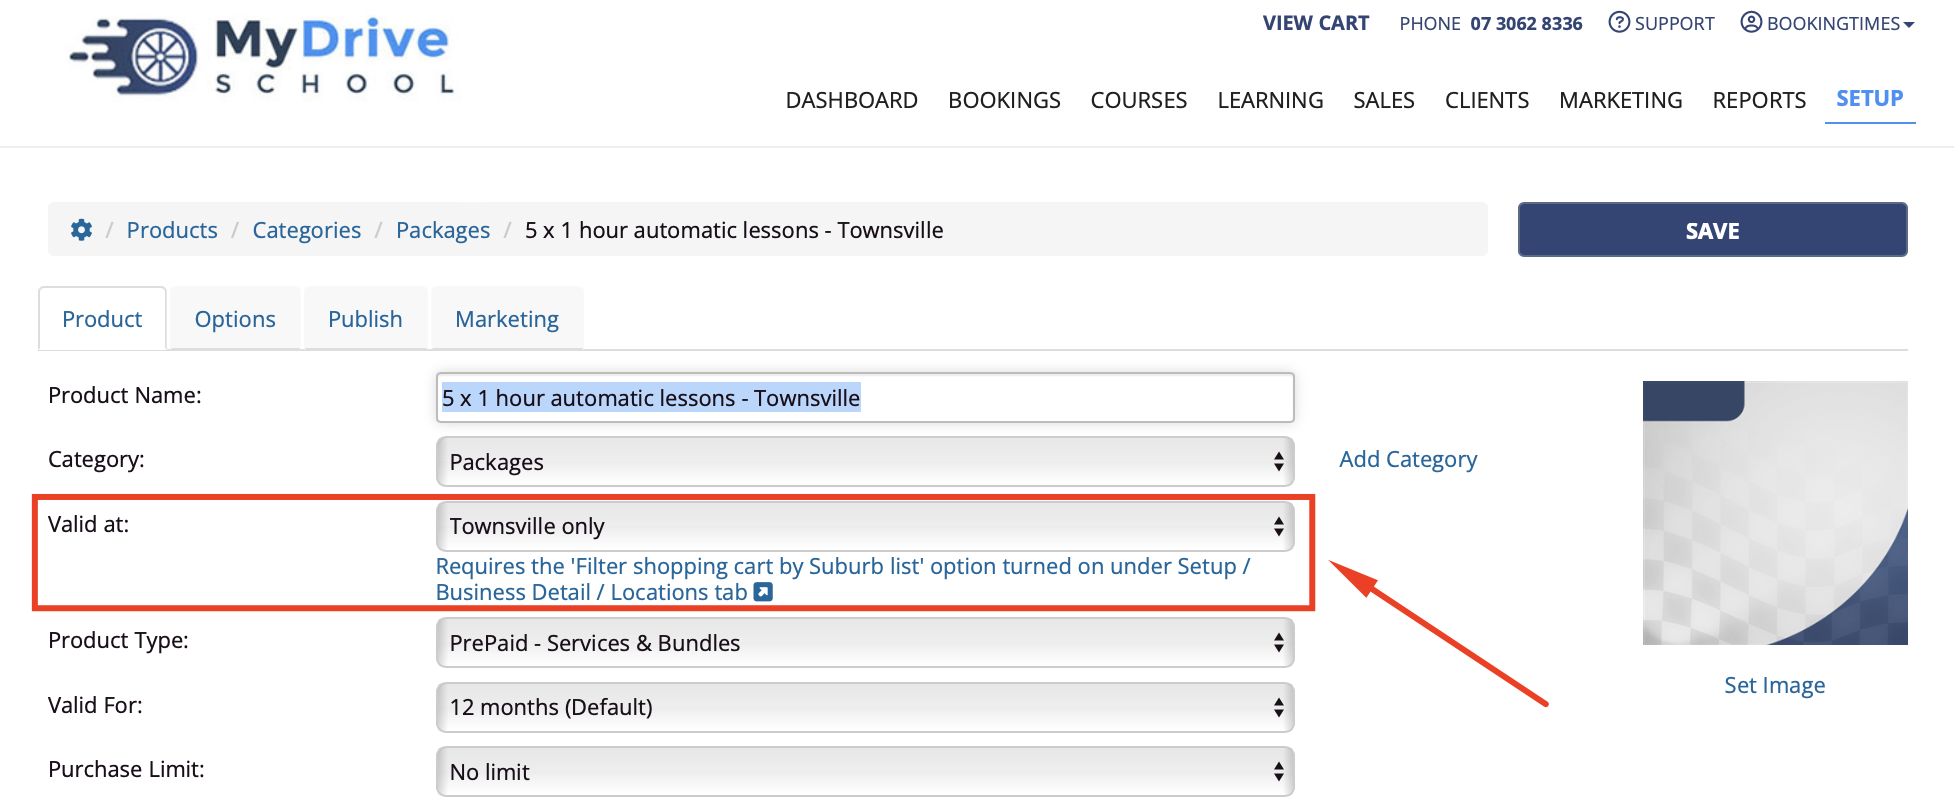
Click on the Requires the 'Filter shopping cart by City list' option turned on under Setup / Business Detail / Locations tab text or navigate to that section
Select the Filter shopping cart by suburb list option
Click Save
Restricting how often a prepaid voucher or package can be purchased
This feature is available on these plans (view pricing)
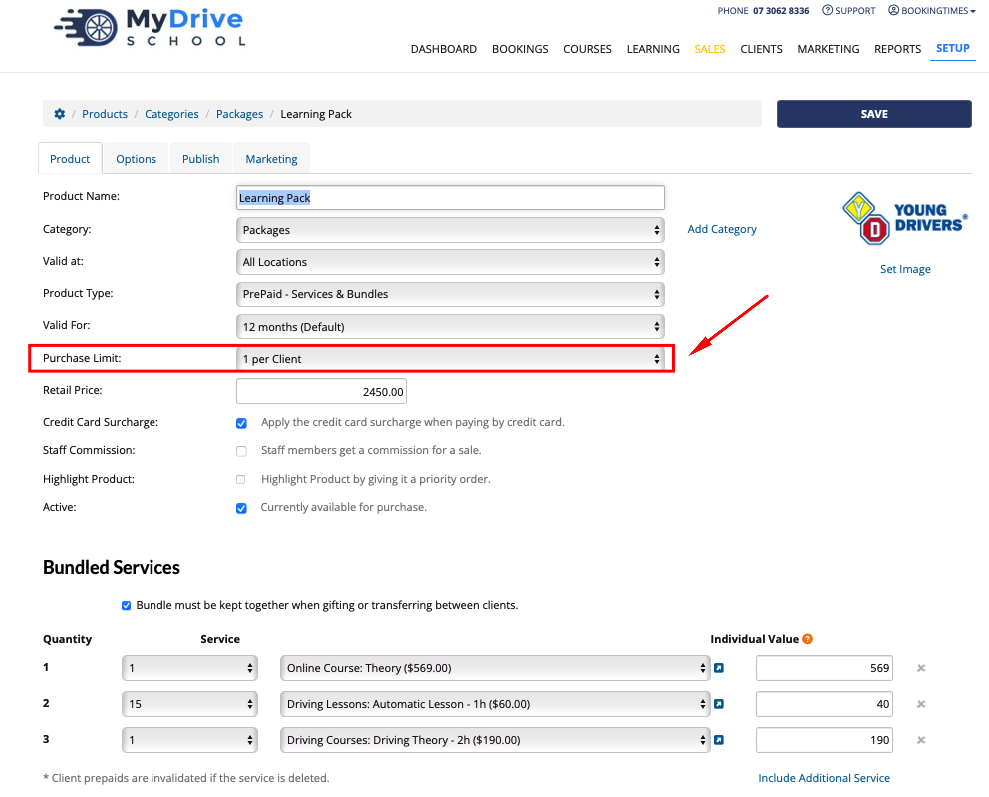
The number of times a prepaid voucher or package can be purchased by a client also be restricted. For example, if you have a special introduction offer that you only want a client to be able to purchase once, then you can set the purchase limit to 1 per client.
Note: a service can also have a Booking Limit set up on a service on this plan.
Steps
Navigate to Setup > Shopping > Products & Packages
Select the relevant product
Select the Purchase Limit you wish to enforce
Click Save
Building packages
Multiple services after often bundled into a package - usually for the purposes of applying a discount, and helps to encourage the client to book multiple sessions.
For example:
1 hour manual driving lesson (normally $70)
5 x hour manual driving lessons package for $300 (works out to be $60 per lesson)
Prepaid/voucher terminology
Please note that you can choose what terminology, prepaid or voucher, is set up within your system.
This can be changed by navigating to Setup > Business Detail > System tab and finding the Prepaid Voucher Terminology label.
This name will be reflected in any of the screens that display prepaid/voucher information, hence some screen captures will show the different terminologies, and is also reflected in the product type name as well: Prepaid - Service Bundle and Voucher - Service Bundle
Understanding packages
When you're looking at bundling existing services into packages, it's important to note that you will be eventually applying each of these to equivalent bookings of these specific services that you've selected when creating your bundle.
For example, a package for "5 x 1 hour auto driving lessons" bundle can only be used to redeem 5 of the 1 hour auto driving lessons. Not 1.5 hour auto driving lessons, and not 1 hour manual driving lessons. This is how the prepaid vouchers are displayed on the client’s account once the package has been purchased.

Using 1 hour prepaid vouchers for other duration lessons
Please note that several 1 hour prepaid vouchers can be used for lessons that are 2, 3 etc hours long. As long as the 1 hour duration fits equally into the lesson duration.
The same also applies to using 1.5 hour prepaid vouchers for lessons that are 3, 4.5, 6 etc hours long.
If the client wishes to change the services within package after they've purchased it (e.g. rather than 3 x 1 hour manual driving lessons they want 2 x 1.5 hour manual driving lessons), please see the Editing purchased prepaid vouchers article which steps you through how to make this update and ensuring your financials remain accurate.
Individual service values in packages
When you're bundling existing services into packages, it's important to ensure that you assign the correct Individual value of each service, often this would be the discounted rate of this service because it's been bundled.
The individual value represents the true value of the prepaid voucher based on the package price, and is responsible for setting the prepaid voucher value, refund amounts and commissions. These individual service values are added into your Liability/Prepaid voucher report once the bundle is created so you know how much money has been paid, although the service hasn't been provided yet.
Retail price / Quantity of services = Individual value
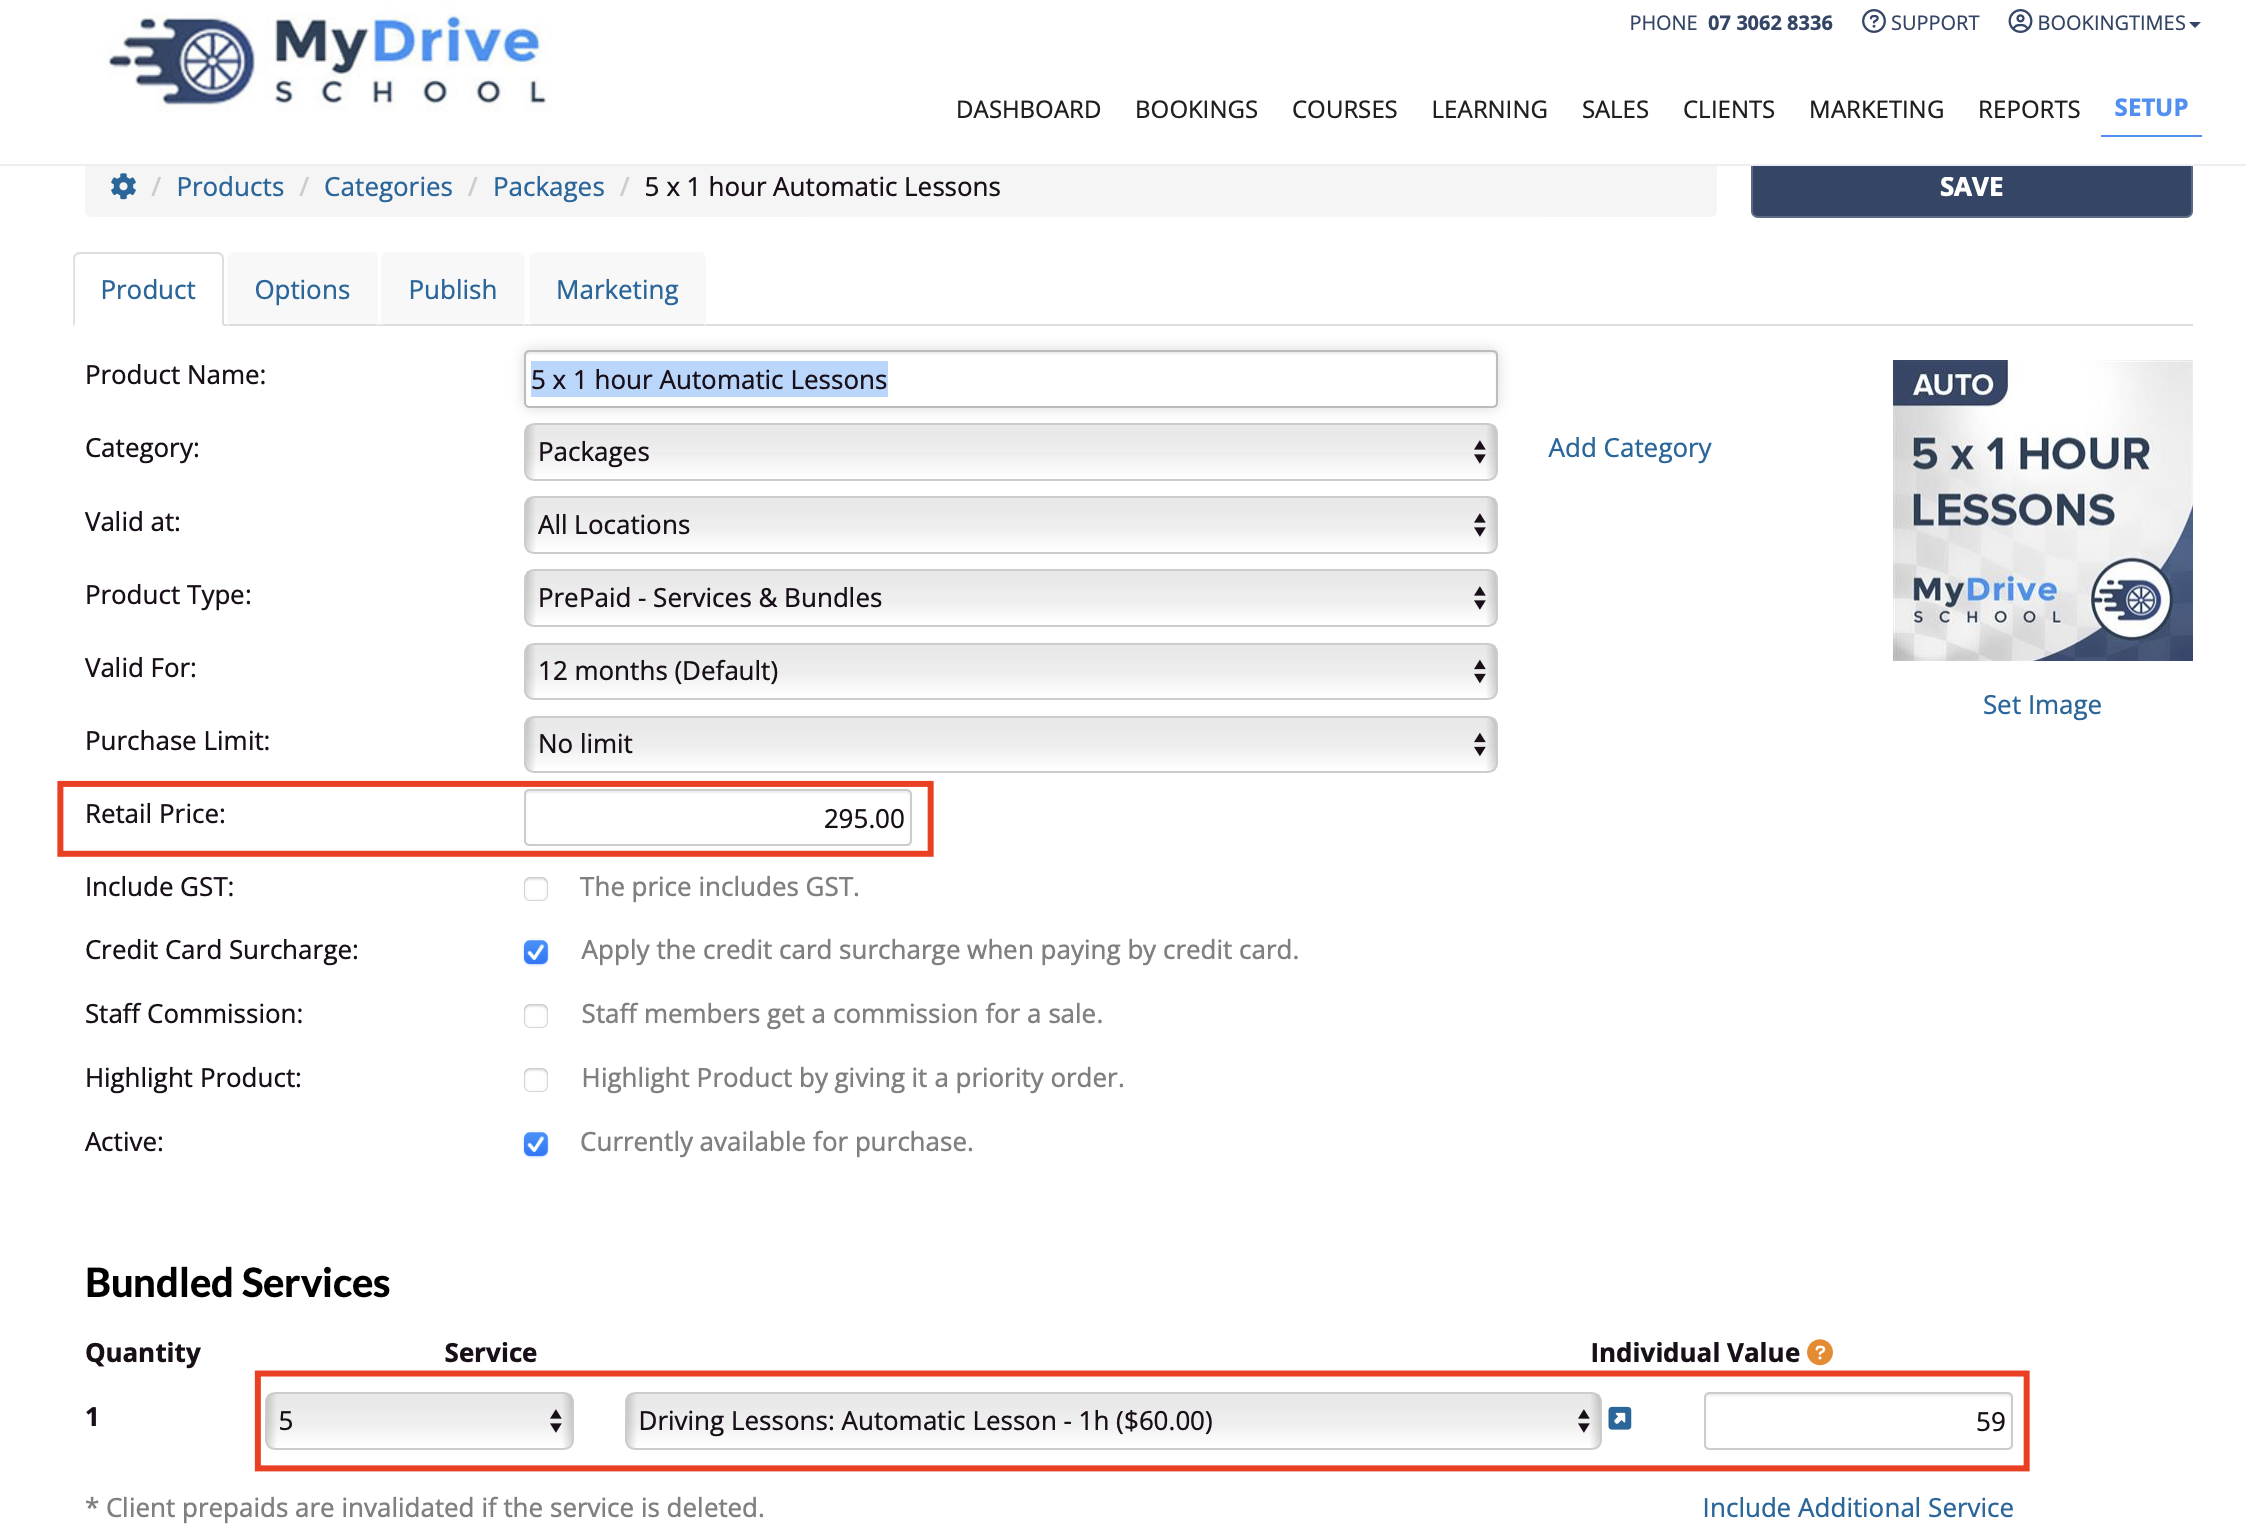
In the below example, the package costs $295 and it consists of 5 x 1 hour auto driving lessons.
$295 (Retail price) / 5 (Quantity) = $59 (Individual value)
Note
Always ensure your individual service values add up to the retail price of your voucher. This is because these impact refund amounts and commissions and will appear in your Liability/Prepaid voucher report.
If you update your package price, then ensure you update the individual service values accordingly so any future purchases have the correct price reflected.