Launching your website involves connecting it to a domain name, i.e. your public online web address. e.g. our domain is BookingTimes.com. This guide will walk you through the steps to configure your domain and successfully take your site live, including if you want to create any branded emails to match your domain name.
Note: After setup, it may take up to 48 hours for your domain changes to fully update on the internet and your website may switch from your old website to your new website in that time while the internet cache is updating.
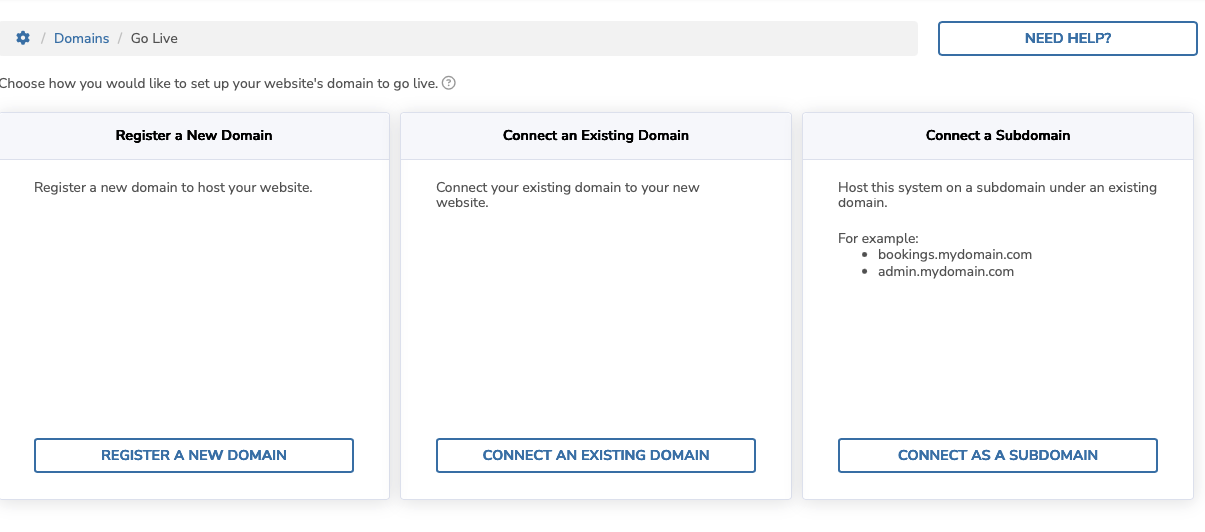
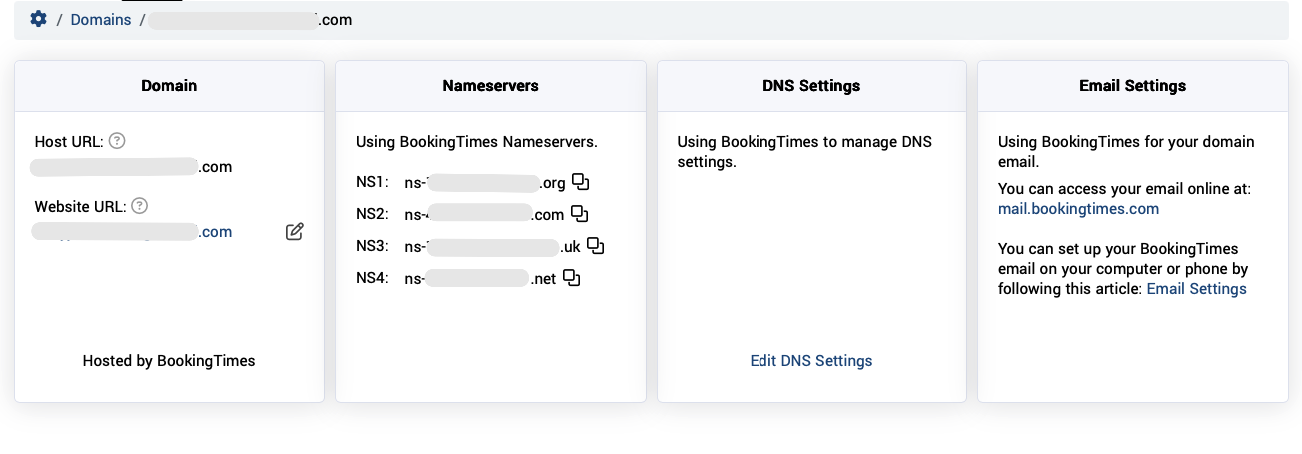
Navigate to Setup > Domain > Domain Management
Here you will see three options for configuring your domain:
Register a new domain
Connect an existing domain
Connect as a subdomain
Choose how you'd like to set up your website's domain and please follow the relevant section below based on your selection.
A domain is the web address users type into a browser to visit your site, such as mydomain.com. It provides a user-friendly way for visitors to locate your website online.
Option 1: Register a new domain
If you do not already have a domain, you can register and purchase one directly through your website. This option allows you to register a new domain and have it automatically configured for your website with by following these steps in the Registering a new domain article.
To start the process of switching your website to use your domain, click ‘Go Live.’
What happens next?
Once you submit the setup request, we will begin making your website live. When we detect that your domain's records are accessible on the internet (this can take 15 minutes to 48 hours), we will switch your hosting from your current website domain to your new domain.
Important: During this transition, your website may be temporarily unavailable while DNS updates propagate across the internet. This is normal and should stabilize shortly.
(Optional) Add additional domain records
This is not required to Go Live if you’re just setting up a standard website with BookingTimes. This is an advanced feature you can use if you want to setup your own custom domain email on an external service, third-party services, or subdomains. You can always add additional records later from your website once it’s live as well.
Choosing your email host
As part of our services, we offer custom-branded email addresses based on your domain through our dedicated email server. These emails enhance your business's professionalism, build trust with your clients, strengthen brand recognition, and boost credibility. They also serve as subtle yet effective marketing tools, showcasing your brand with every interaction.
You will be able to access your emails via our web portal at https://mail.bookingtimes.com. Detailed instructions for accessing your email are available in this article Accessing your BookingTimes email.
That said, this service is entirely optional! If you’re happy with your existing email setup, you can absolutely keep using it. Switching to our email service requires updating your domain’s email settings to route emails through our server instead of your current provider (e.g. Outlook, Google).
When switching email providers, you can easily import your existing emails by following the steps outlined in this guide Import emails into BookingTimes.
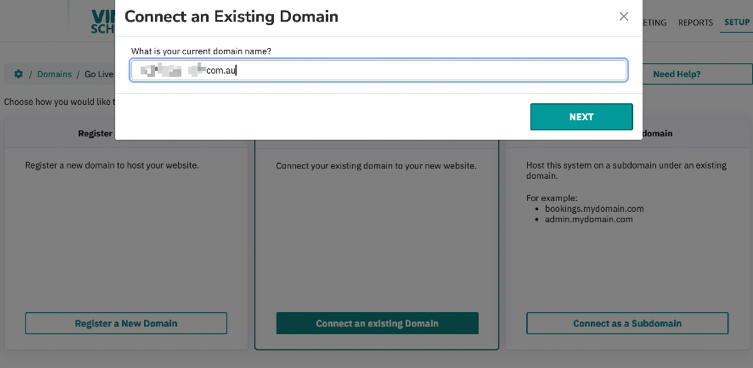
Option 2: Connect an existing domain
If you already own a domain, you can connect it to your website.
Steps
Navigate to Setup > Domain > Domain Management
Click ‘Connect an Existing Domain’
Enter the domain name you want your website to be.
Click ‘Next’
Choosing Email Host
You will be asked if you’d like BookingTimes to create a branded email to match your domain (e.g. info@yourdomain.com), or use an existing email via an external email provider You can choose one of the following options:

1. (Recommended) Use BookingTimes Hosted Emails
If you don’t already have a branded email, we recommend selecting "Use BookingTimes" for the easiest setup.
A default info@yourdomain.com email will be created during this setup. Additional emails can be created after via Creating a BookingTimes email
2. Use an External Email Provider
If you already have branded email, select the appropriate email provider.
Choosing Nameserver configuration
From here you will be asked what you want your nameservers to be. Nameservers tell the internet where to find your domain's information. You can choose one of the following options:
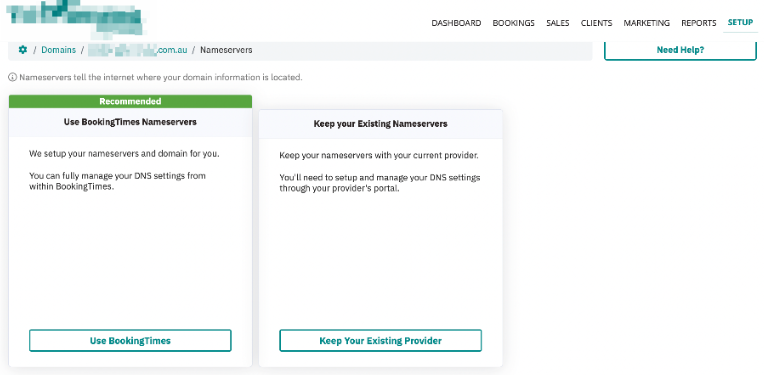
1. (Recommended) Use BookingTimes Nameservers
We will set up and manage your domain's nameservers and DNS settings for you to get your website live.
You can fully manage your domain settings from within BookingTimes (via the Edit DNS Settings link)
If you're unsure, we recommend selecting "Use BookingTimes" for the easiest setup.
2. (Advanced) Keep Your Existing Nameservers
Your nameservers will remain with your current provider.
You’ll need to manually configure your DNS settings through your domain registrar providers portal. Any required DNS settings can be found via the Edit DNS Settings link
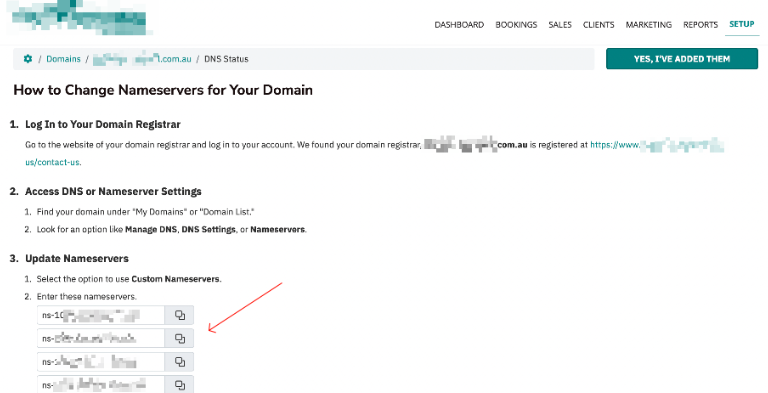
Going live
From here custom instructions will show on how to update your domain. This will either be updating your Nameservers to the ones we provide, or adding the supplied DNS records that you will need to add to your domain provider. Updating domain settings is different for different providers so it’s best to view your domain providers help guides for this step.
Once completed ensure you click the YES, I’VE ADDED THEM button to trigger the go live process.
For example - adding our nameservers to your domain:
(Optional) Add additional domain records
Do I need to add additional DNS records?
If you’re just setting up a standard website with BookingTimes, you don’t need to add any additional records. This is an advanced feature and not required to go live. You can always add additional records later from your website.
If you’re using your own nameservers, you’ll need to manually configure your DNS settings through your domain registrar providers portal. Any required DNS settings that need to be copied over can be found via the Edit DNS Settings link (accessed via Setup > Domain > Domain Management)
Option 3: Connect a subdomain
A subdomain is like an extra section of your website that comes before your main domain name. For example, if your main website is mydomain.com, a subdomain could be shop.mydomain.com or bookings.mydomain.com.
People choose a subdomain when they want to keep something separate from their main site—like an online store, a learning portal, or a booking system—without needing to buy a brand-new domain name.
If you already own a domain, you can connect it to your website.
Steps
Navigate to Setup > Domain > Domain Management
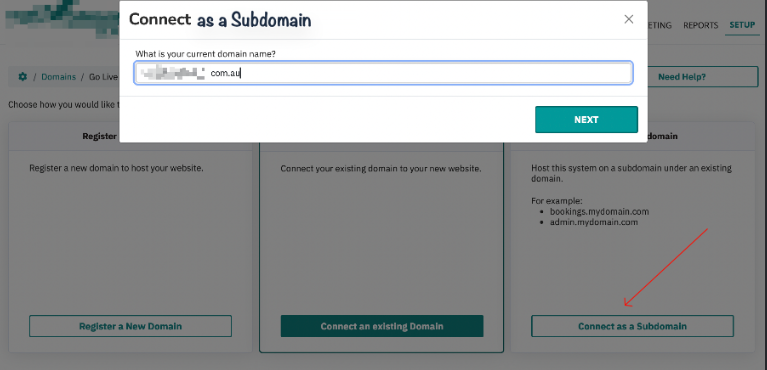
Click ‘Connect as a Subdomain’
Enter the subdomain name you want your website to be.
Click ‘Next’
Choosing Email Host
You will be asked if you’d like BookingTimes to create a branded email to match your domain (e.g. info@yourdomain.com), or use an existing email via an external email provider You can choose one of the following options:
1. (Recommended) Use BookingTimes Hosted Emails
If you don’t already have a branded email, we recommend selecting "Use BookingTimes" for the easiest setup.
A default info@yourdomain.com email will be created during this setup. Additional emails can be created after via Creating a BookingTimes email
2. Use an External Email Provider
If you already have branded email, select the appropriate email provider.
Choosing Nameserver configuration
From here you will be asked what you want your nameservers to be. Nameservers tell the internet where to find your domain's information. You can choose one of the following options.
Note: Given you already have your main domain - please ensure you discuss with your domain expert to determine which option should be chosen at this point to ensure it doesn’t affect your existing site.
1. Use BookingTimes Nameservers
We will set up and manage your domain's nameservers and DNS settings for you to get your website live.
You can fully manage your domain settings from within BookingTimes (via the Edit DNS Settings link)
2. (Advanced) Keep Your Existing Nameservers
Your nameservers will remain with your current provider.
You’ll need to manually configure your DNS settings through your domain registrar providers portal.
Going live
From here custom instructions will show on how to update your domain by adding the supplied DNS records that you will need to add to your domain providers. Updating domain settings is different for different providers so it’s best to view your domain providers help guides for this step.