An invoice can be created for unpaid bookings and product sales. This covers if both a client or admin makes a booking or product sale (so payment is not required upfront) and an invoice is to be sent to the client to request payment.
This article covers these scenarios, as well as how you can configure the invoice content.
Invoices for paid bookings or product sales
Once a booking or product sale is paid for, an invoice will be created by the system and you can then email the invoice to the client as part of the payment process. Please see the Emailing an invoice article for more details.
Booking invoice
Once a booking has been created, you can generate an invoice from the booking detail screen.
Steps
Navigate to the Booking
Select View Invoice to preview the invoice, and select Email Invoice to email the invoice to the client

Product sale invoice
Once a product sale has been initiated, you can generate an invoice from the product sale detail screen.
Steps
Navigate to the Sales menu
Create a New Sale
Add client & product detail including Sale Date, Sales Person, Client, Voucher Recipient and optionally Purchase Order
Click Save Invoice in the menu

Immediately after you click Save Invoice, options to email or print the invoice will appear in the menu. This invoice will automatically update to the client account.

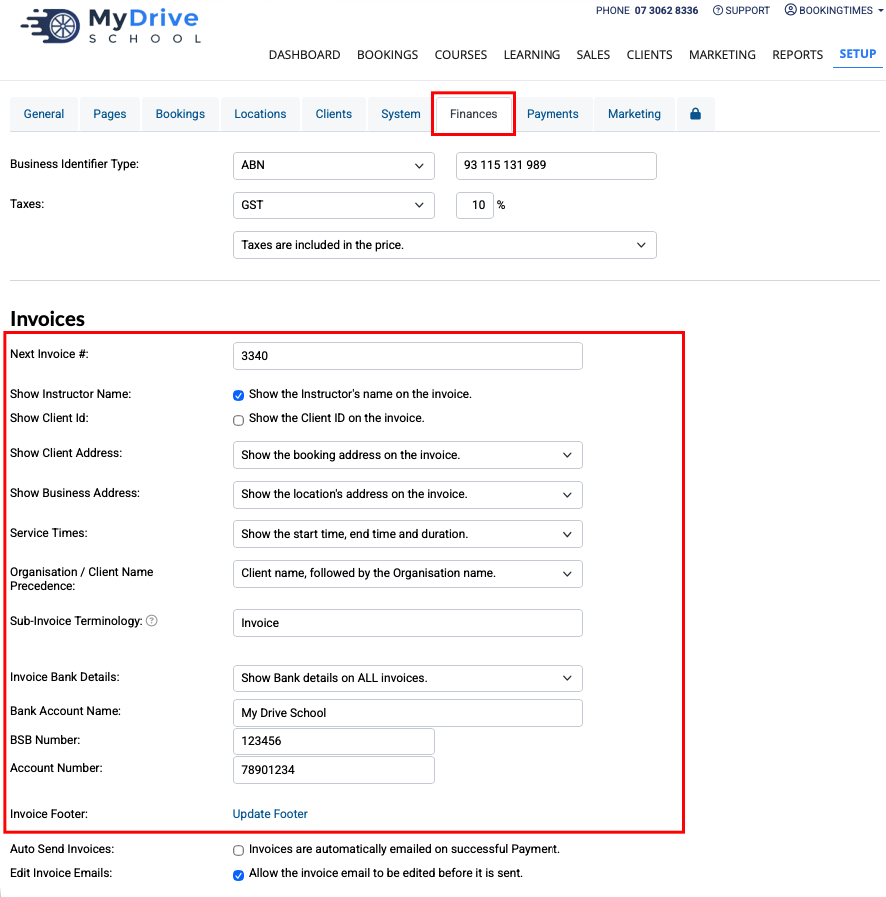
Invoice content details
The invoice can be configured to include different details. This includes displaying different information based on the payment status, and a range of other details regarding the booking (including service specific additional information) and bank details. An invoice note can also be added manually to already created invoices.
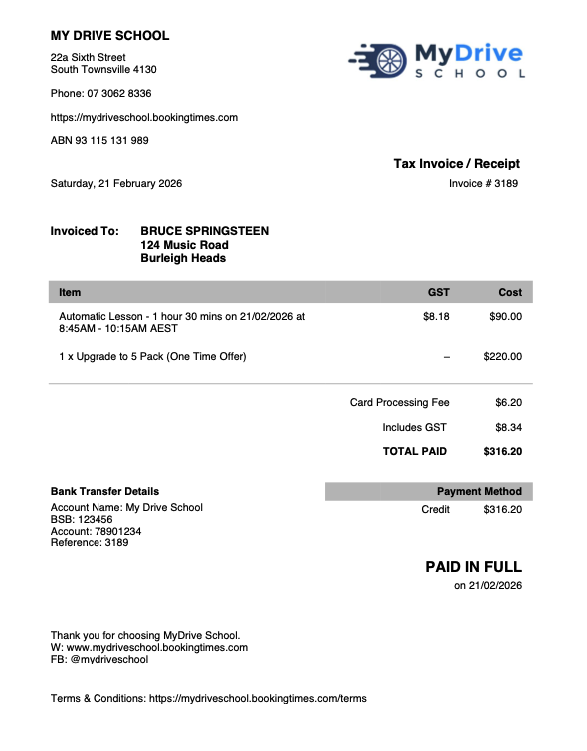
Payment status
Unpaid: If the service has not been paid, the invoice will indicate that payment is outstanding.
Paid: If the service has been paid for, the invoice will indicate the payment method and amount.
Other invoice details
A range of options are available to configure what information you'd like to appear in the invoice. These include:
Instructor's name
Client ID
Client address (show none, show booking address, show client address)
Business Address
Service Times (start time and duration, start/end time and duration)
Organisation/Client Name Precedence
Invoice bank details (show on all/none invoices, show on only unpaid)
Service specific additional invoice text
Additional invoice text can be set on a specific service.
Navigate to Setup > Bookings > Services > select service > Options tab
Set any additional text in the Additional Invoice Text field

Click Save
When you view an invoice for this service, the text will appear under the service description

Invoice note
An invoice note can be manually added to an already created invoice.
Navigate to the booking or product invoice
Select the Set Invoice Note option on the left hand menu

Enter the invoice note and click OK

When you view an invoice, the text will appear as follows, above the Invoice footer (if one is added)

Invoice footer
An invoice footer that will appear on all invoices can also be defined and is set up as follows:
Setup > Business Details > Finances tab
Go to the Invoice Footer section and click the Update Footer link
Add any footer text into the text box and click Set
Click the Save button back on the Finances tab to ensure updates are saved
